This is a post about my learning of continuous improvement on our startup.
This week, I’ll share about the continuous improvement we’ve done on our startup and what I learn from it.
Previously, I shared that after updating our landing page for demand validation, we saw the conversion rate doubled and we were quite satisfied with the improvement. Next is to wait until we had enough conversion to move on to the next step. For a while, I was indulging in the “success”, naively of course 😉
I grew up with this Chinese idiom stuck in my head: 学如逆水行舟,不进则退. It translates literally to “Learning is like rowing a boat upstream, if you don’t keep pushing forward, you’ll fall behind”. I’m also a DevOps advocate, for which continuous improvement is part of the trade. Though for a while, it didn’t occur to me that I need to continuously improve our ads, not until I stumble across the “Experiment” feature of Google Ads. ¯\_(ツ)_/¯
That reminds me of what I saw in our company’s weekly updates, what A/B test was done, its result, and what change was done to improve further. That’s a strong reminder that I also need to continuously improve our business. I’ll go into the why shortly, let’s look at the what for now.
Google Ads Experiment
Google Ads Experiment is a guided and automated step that can also be done manually. I’ve tried both approaches, the limitation of either method is the deciding factor on which to use.
For an experiment, Google Ads can be instructed to apply draft changes that are performing better than before. Those changes can be anything from keywords down to ads wording. The limitation, only one experiment is allowed at a time, but experiments can be queued, making this a useful feature for ongoing improvements.
When done manually, we can either create new Ads Group or Campaign and compare the results ourselves. I went with this to do our branding test because we have 7 brand names to test. Although it’s still possible to use Experiment but testing each brand sequentially might include seasonality bias in the data. We wanted a more accurate data from this test.
Improvement
I set up to run the branding test for 4 weeks, and there’s one week left. I’ll share the result next week. But now we can already observe the improvement from some of the more favorable brands.
The graph includes data 1 week before we started the branding test to provide a before and after comparison
Our CTR grew from 1.16% to 2.76%. That’s the average of all 7 brands. Our top brand actually fetches more than 5% of CTR and we’re just hitting the industry average according to Instapage.
Our conversion rate goes from 3.36% up to 5.24% and it’s better than the industry average of 4.40%. Our top brand managed to push the number further to 6.19%. I’m really satisfied with the result. But it’s not the time to be complacent.
Why
Although the experiments in this post were about demand validation and branding test, continuous improvement applies to all areas of the business, or any business for that matter.
Every business, no matter who runs it, faces ongoing change. The only constant of business is change. The only constant in life is change.
The world is changing constantly so are consumers’ needs. Looking at the closing of Speedy Video after 3 decades, while consumers’ needs have changed they continue to serve them the same way. On the contrary, the company I worked in, it’s 10 years old and they never stop improving their customers’ satisfaction, which is why they’re one of the top 3 of their industry right now.
Changes can also come from the environment, the competitive environment in this case. We’re expecting strong competition after we launch, either from existing players or new ones who saw the same opportunity that we saw. We’re now in the training pool learning our way, hoping that one day we can swim alongside the big players in the competition pool. Without continuous improvement, we’ll be out of the game in no time 😉
What’s Next
In the next post I’ll wrap up branding test and share more about biases in business decision and what we can do about it.
This post is about my foray to start a new business with 2 friends following the lean startups’ methodology and what I learn from it.
This post is about my foray to start a new business with 2 friends following the lean startups’ methodology and what I learn from it.
Recently a very entrepreneurial mentor of mine called to talk about a business idea. This is quite a common type of call I get from him. I see him as a visionary person and someone who can spot a business opportunity from miles away. Most of his business ideas are anything but traditional.
Most of the ideas we discussed are just ideas. Having a business idea doesn’t always mean it will result in a sustainable business. But sometimes through our discussion, some of the ideas spark new insight into other opportunities. This is one that he managed to convince me there’s a real demand for us to supply to. He also convinced a close friend to join us. This partner is an subject-matter-export for the product that we’re trying to create.
Starting Up
Most of the businesses that my mentor started, require him to be on the ground understanding all the intricate details involved and evolving that into what they are today iteratively. But for this new business, it’s going to be 100% online, which is where I can contribute technically. I’ve also worked in a startup going through product-market-fit as well as having read The Lean Startup, or so I thought 🙂
In the first meeting, I was tasked to set the technical direction and ideas on where to “start”. We agreed that it’s a risk if no one needed our product. So that’s the biggest risk that we need to validate before we invest in building the product. Initially, I proposed doing market research to affirm our business idea. Although I’ve read The Lean Startup, I never get to apply the principle of demand validation at the earliest stage. I was lost, but luckily I knew a close friend, Yazid, a design thinking guru who had done this for his highly demanded WagyuBox . He explained how he applied the principle from the book and provided me some ideas to test the demand of our product without actually having the product first!
Demand Validation
So I went ahead and set up demand validation by using Google Ads. Crafting a brief description of what the product is, and then point to a landing page that I whipped up from some free template. On the landing page was a simple form asking for the visitors’ email, for those who want an update when our business is ready to serve.
I didn’t waste too much time setting up the best-looking landing page, but I was also worried if anyone is really going to provide us their email. After 5 days and 95 clicks, I finally saw 1 email in the log! I was so happy that it actually worked. I’ve never been so anxious about my work before 😅
When toying around with the ad’s wording and keyword selection, I noticed some interesting cause and effect. The ad is configured to maximize clicks, and we pay each click by the price Google bids the ad automatically for us. With the “right” keyword, I can surely attract a lot of clicks, but at the end of the day, are those visitors our target audience? Not all visitors equal interested customers. They might have been duped by the “right” keyword, a.k.a click-bait. In the end, I find having an ad with genuine intention provides the best value for money. Why pay someone to come to visit your shop knowing they never going to buy anything.
Over 4 weeks of experimentation, we managed to attain an average CTR(click-through rate) of 1.59%. For the keyword that’s closest to our product, we managed to achieve a CTR of 5.82%, which we believe it’s pretty impressive. But we also needed keywords of our competitor name in it, to widen our reach, hence an overall lower CTR. As for conversion rate, which represents those with true interest, it averages at 1.61%.
“If you’re not embarrassed by your first release, you probably spent too much time on it.”
Reid Hoffman
After 2 weeks of the ad run, we hired a product designer to update the design of our landing page, and the conversion rate went up to 3.26%. About double, which was our initial ballpark guestimate. That also proves I never belong in the design department 😉
What’s Next
We’ve nailed the keyword and wording on the ad, and most importantly, we’ve validated the demand with just a small amount of ads fee. From those emails we’ve collected, we want to engage with the users to help tweak our product offering to more closely meet their needs. But we have yet to register a company and decided on our branding. So that’s what we’re going to do first.
While waiting for the ads to run, we’ve come up with a list of brand names that make sense for our product, but that’s just our opinion. Why not let the user decides? I’m going to set up multiple ads each with a brand from our list, and we’ll measure the effectiveness of them while removing our personal opinion from the equation! That’s for the next part of this series.
Take away
Nowadays with the aids of online marketing tools, starting a new business especially with lean startups methodology can help reduce the risk greatly. Knowing whether there’s a real demand for the product/service that we want to sell is really important to ensure a successful business before we invest in building the actual product.
I injured my wrist recently, wasn’t serious enough to see a doctor (yet) but there’s an uncomfortable position that I wanted to avoid. From what I learned about recovering from my back pain, to aid the recovery of my wrist I need to avoid irritating it, especially the tendon and ligament.
I’ve seen others using wrist braces and I thought to give one a shot, but then I don’t like to buy single-use products. After some research, I was wondering if I could 3D print my own. In my mind, the design would have to be designed in 3 dimensions (duh!) but since the shape of each person’s hand is different, it would be near impossible to get a good fit with existing models available online.
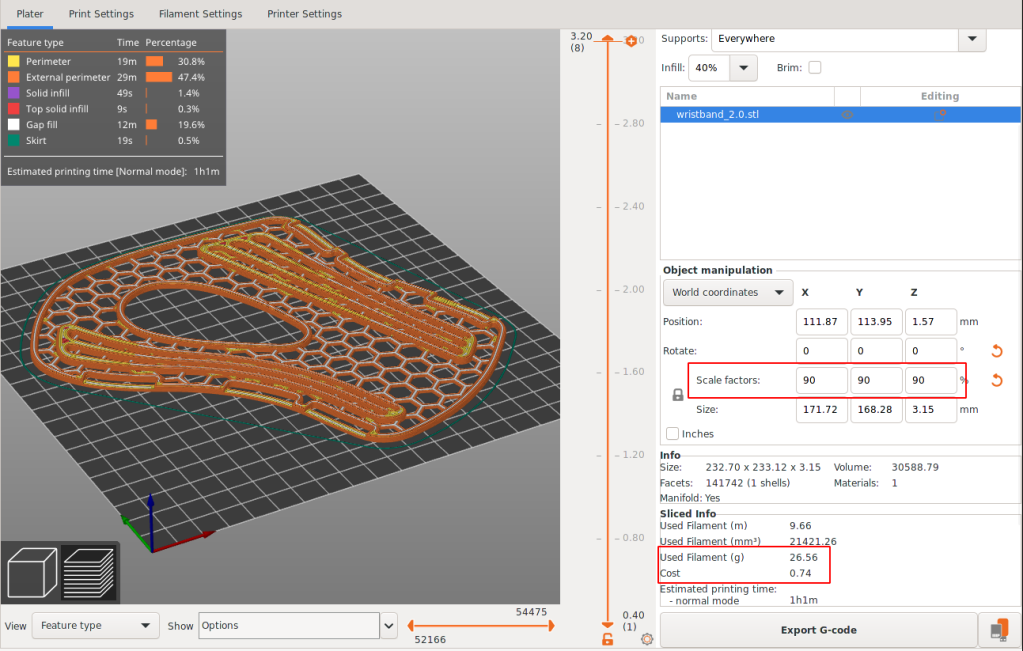
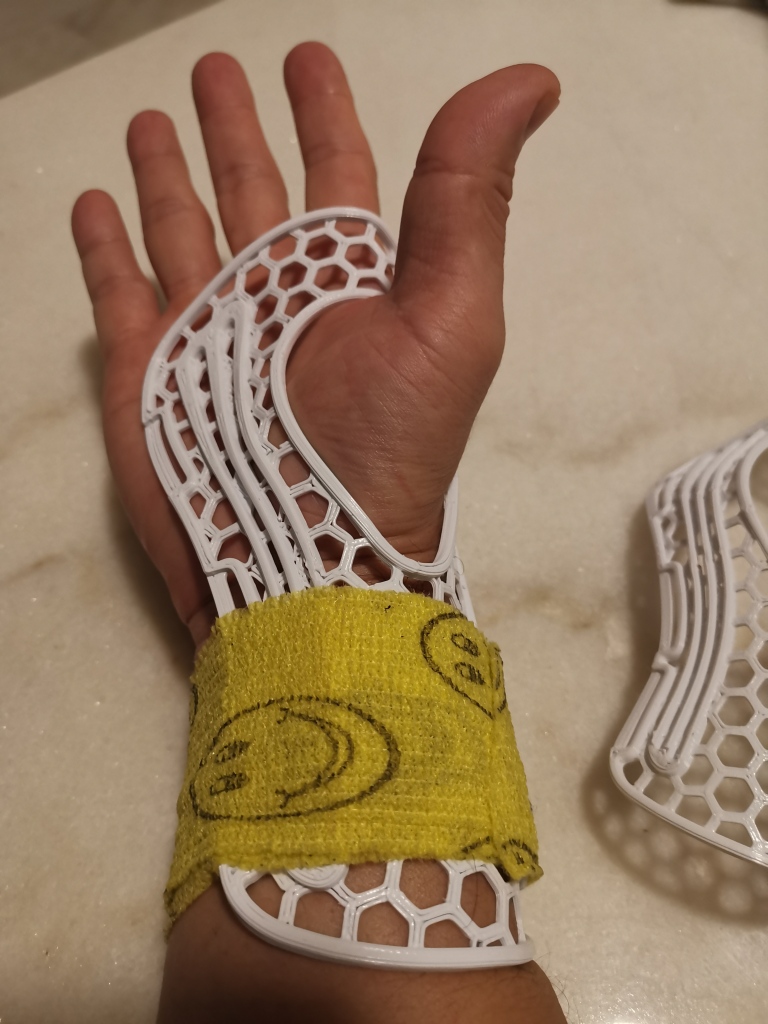
Turn out there’s a smart designer who designed a model that’s printed flat, soften it with hot water and then mold it to fit the hand. That’s so brilliant!!! The common 3D printing material, PLA had an inherent problem, it softens under the heat of the sun. It starts to soften at around 60’C. But for this case, he turns that into a feature, to make an easy-to-print model that fits all hands.
Since my Asian hand is typically smaller, I test print with a scale at 75% and later found it to be a bit tight near the thumb, so I end up with 90%. Slic3r shows that it only cost me $0.74, about $1.50 for both prints.
Scaled to 75% on the left and 90% on the rightTest fit. I reuse the wrap from my blood donation, love the smiley!
I’ve recently experienced another commercial product that uses the same technique to achieve self-fitting, SOVA Night Guard. I’m amazed by the outcome, and it cost less than 1/10 of what the dentist going to charge me for a custom fit night guard, while not having to make 2 trips to get it done. Talking about progress in material technology!
I don’t think robots replacing humans is the only problem we’re are facing, advances in technology will always threaten how things are used to be and challenge our comfort zone. The solution is to embrace the change rather than resist.
As a maker, I actually feel that we’re now more empowered than ever to solve existing problems with more creative and ingenious solutions.
I’ve recently participated in a CTF (Capture The Flag) organized by HackTheBox and had a lot of fun solving the hardware and misc challenges. This is a quick write-up on my solutions.
I’ve recently participated in a CTF (Capture The Flag) organized by HackTheBox and had a lot of fun solving the hardware and misc challenges. This is a quick write-up on my solutions.
I noticed that 5 out of 6 of the hardware challenges and 1 of the misc challenge are based on logic analyzer capture, specifically from Saleae, which is a popular brand among the maker/ hardware hacker community.
The capture file from Saleae’s logic analyzer is in SAL extension, analogous to PCAP file from the software world, except this is the physical layer, yes OSI layer 1!!! Although it’s not network packets but it’s easier to explain by borrowing the OSI model.
I don’t own any Saleae Logic Analyzer, the software is usable without the hardware. I used Saleae v2 for all the related challenges. V1 should work, except the steps for Alienspeak might be slightly different.
Side note, before you get adventurous, you can’t peek into current day ethernet signals, it’s too fast for Saleae which only has a bandwidth of 25Mhz. Forcing your NIC to run at 10Mbps might help though your switch will scream at you!!! It’s best to leave that to a professional logic analyzer with a 5 digit price tag 😅
Intro: Tools
I use python and some bash to help automate or decode data. Sometimes I’ll jump onto https://gchq.github.io/ if I need to test more complicated decoding sequences. For python I stick with my trusty jupyterlab setup, which persist the output even after restart, and very helpful when I need to go back and pull details to do this write-up. Most of my python script for the CTF are quick hacks, so read “lightly” 🙂
Serial Logs
We have gained physical access to the debugging interface of the Access Control System which is based on a Raspberry Pi-based IoT device. We believe that the log messages of this device contain valuable information of when our asset was abducted
Only one SAL file was provided. The capture shows only 1 channel with signal activities, and looks like serial/uart. The frequency is close to the standard 115.2kb serial speed. After turning on Async Serial analyzer with 8 Bits per Frame, 1 Stop Bit, No Parity, the decoded data looks legit
Checking the pulse width the frequency, which is close to 115.2 kb. After turning on Async Serial analyzer, decoded data looks legit
After scrolling through 3 quarter of the messages, no obvious flags, then framing error shows up. The message before the framing error indicate what’s going on, and obviously.
[LOG] Connection from 4b1186d29d6b97f290844407273044e5202ddf8922163077b4a82615fdb22376
[ERR] Noise detected in channel. Swithcing baud to backup value
The change in baudrate will cause framing error, the red cross indicate unexpected signal outside of the frame for 115.2kb. The new frequency looks like 74.25kb.
74.25kb is not standard serial/uart baudrate, but it’s used by ESP8266 during bootup, hence the number make sense. The exact baudrate is not required since serial/uart decoder usually can tolerate up to a few % of error. After switching the baudrate, some familiar character shows up, but there’s a bit of error here and there.
It looks like there’s an extra bit leaking over, so it could be 2 Stop Bits or there’s a parity somewhere. Turn out it’s Even Parity Bit. Once the framing error is clear, just need to scroll until we see the flag
When I first attempted this, I actually exported the data into csv and parse it in python. It’s much faster for me than to scroll around looking for the needle in the haystack. Below is the
log1_data = ""
with open("74250b-export.csv") as f:
    while line := f.readline():
        if line[0] == 'T': continue
        if int(line.split('.')[0]) < 8:
            log1_data += bytes.fromhex(line.split(',')[1][2:]).decode('ASCII')
print(log1_data)
...
[LOG] Connection from 099319f700d8d5f287387c81e6f20384c368a9de27f992f71c1de363c597afd4
[LOG] Connection from ab290d3a380f04c2f0db98f42d5b7adea2bd0723fa38e0621fb3d7c1c2808284
[LOG] Connection from CHTB{wh47?!_f23qu3ncy_h0pp1n9_1n_4_532141_p2070c01?!!!52}
[LOG] Connection from CHTB{wh47?!_f23qu3ncy_h0pp1n9_1n_4_532141_p2070c01?!!!52}
Compromised
An embedded device in our serial network exploited a misconfiguration which resulted in the compromisation of several of our slave devices in it, leaving the base camp exposed to intruders. We must find what alterations the device did over the network in order to revert them before its too late
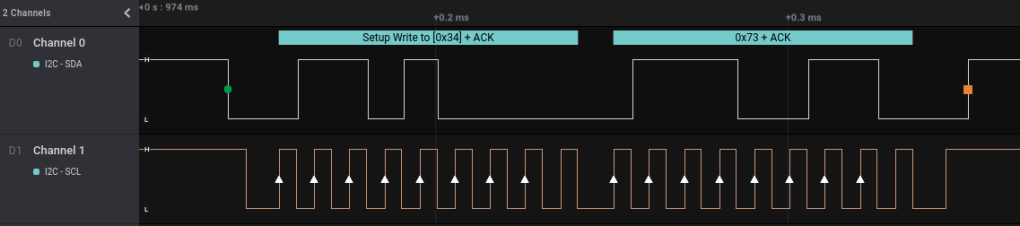
Similar to the previous challenge, but this time both channels shows signal, and Channel 1 shows consistent pulses, very likely a clock line. The signal looks like I2C, with SDA (Data) on Channel 0 and SCL (Clock) on Channel 1.
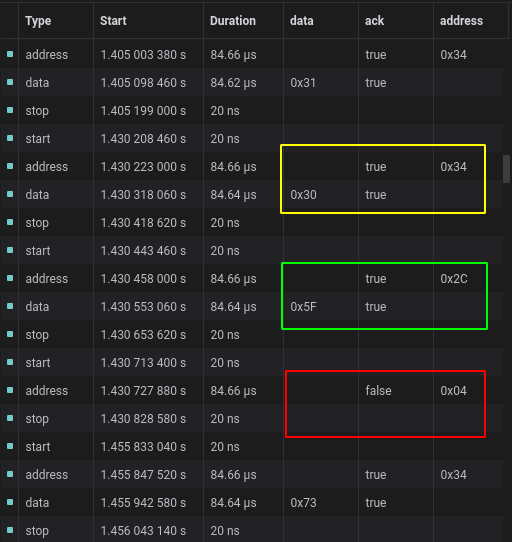
The I2C start/stop signal crossing with the clock can be seen on the 2 bytes above, and the address and instruction was decoded correctlyThe I2C master is sending data to 3 different addresses, and one of them not responding with ACK
Time to export and decode the data going through each of the address, and turn out 0x2C is where the flag is.
log1_data = ""
with open("i2c-export.csv") as f:
    while line := f.readline():
        line_split = line.split(',')
        print(line_split, end='')
        if line[0] == 'T':
            print('')
            continue
        c = bytes.fromhex(line_split[3][2:]).decode('ASCII')
        print(c)
        if line_split[2] == '0x2C':
            log1_data += c
            if line_split[1] == '':
                print(log1_data)
                log1_data = ""
print(log1_data)
We need to find cover before the invasion begins but unfortunately, the bunker is secured by a smart door lock. The keys of the device are stored in an external microSD connected with wiring with the unsecured part of the device enabling us to capture some traces while trying random combinations. Can you recover the key?
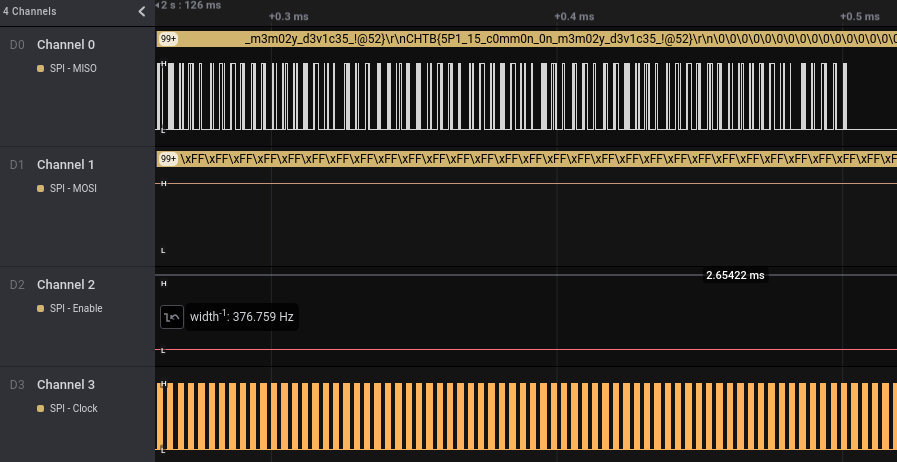
Taking cue from the challenge text, microSD is an indication of SPI bus and since this is a smart door lock, there’s a chance that one of the SPI pin will be used for alternative purposes.
The 3 wide slow pulses from Channel 3 correspond to electro-mechanical signals, likely for the lock since this is a smart door lock. The dense part on the right should be where the meat of the data signal is.After zooming way way in. SPI is a high speed protocol, which is why it’s used for SD.
Since we already know this is SPI, there’s going to be 4 signal involved namely Chip Select (Enable), Clock, Data In and Data Out. Channel 3 is consistent and “noisy”, so that’s the clock. Channel 2 changes outside of the clock boundary, so that should be the Chip Select. Typical slave devices expect input before returning data, so Channel 1 should be Data In and Channel 0 Data Out. The official name for the data pin is MISO and MOSI which stands for Master In Slave Out and Master Out Slave In. I really like this naming convention as it’s really clear which way the data is flowing.
Most of the SD operation is reading, with some address sent and getting a long stream of data backNo python required to skin this cat
Off the grid
One of our agents managed to store some valuable information in an air-gapped hardware password manage and delete any trace of them in our network before it got compromised by the invaders but the device got damaged during transportation and its OLED screen broke. We need help to recover the information stored in it!
The 3 challenges before this a quite trivial for those with hardware experiece, since it’s just decoding data from layer 1 or 2. This one goes all the way up to the presentation layer(OSI Layer 7)!!!. Technically presentation layer is 6, but I would argue that this represent the the renderer on the browser, hence layer 7.
What this entail is a series of data to reconstruct the image displayed on the OLED screen as indicated by the challenge text. In a computer analogy, this is the dump of the graphic card memory encoding the pixels to be projected on the monitor. The good news, this is monochrome.
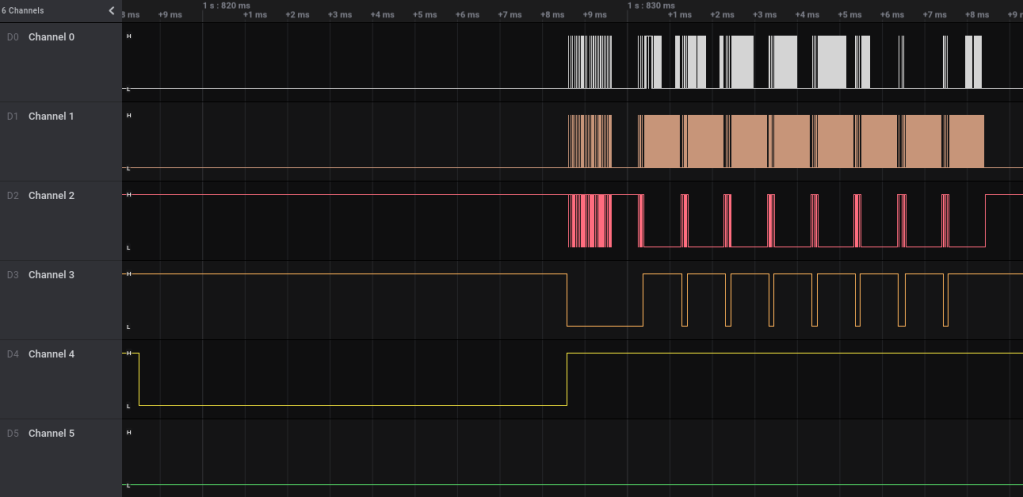
Since this is a display, which slice of data could be a single complete frame. Channel 5 is not used
A single complete frame. Here Channel 4 looks a reset line, most display controller requires one to operate.
This looks similar to SPI, which is also a common method to wire up a display, except it’s a modified SPI and there’s no data out. There’s no use to read what’s on the display, graphic memory is the “source of truth”
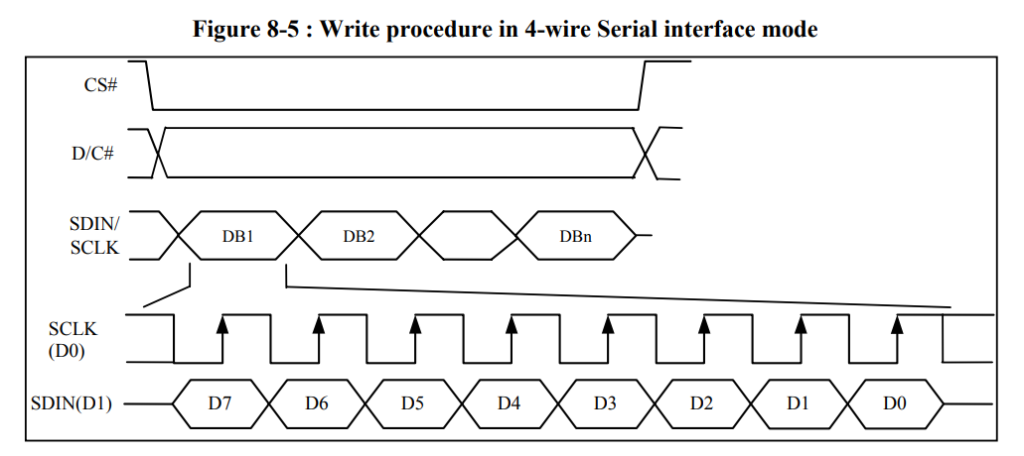
Channel 1 is the clock, Channel 2 looks like Chip Select (Enable) since it’s outside of the clock boundary. That leaves Channel 0 with slightly iregular pulses to be Data. Channel 3 is the modified part of the SPI, it’s called Data/Command (Some variant use Register Select). It’s to signal to the display controller if we’re sending commands or pixel data. Most setup commands are sent upfront and the pixel data is then stream continuously to the display controller. There’s an internal auto increment pixel address counter that roll over at the last pixel. The size of this counter is set in the command.
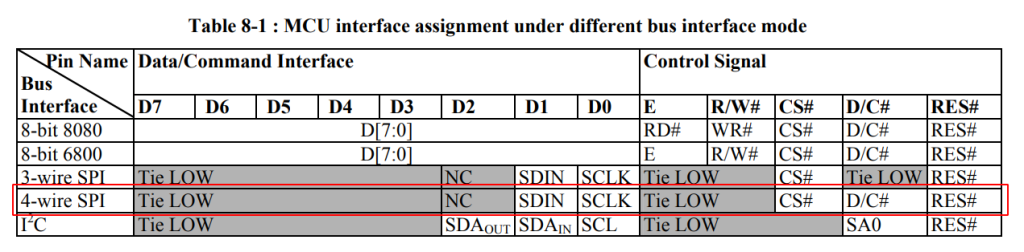
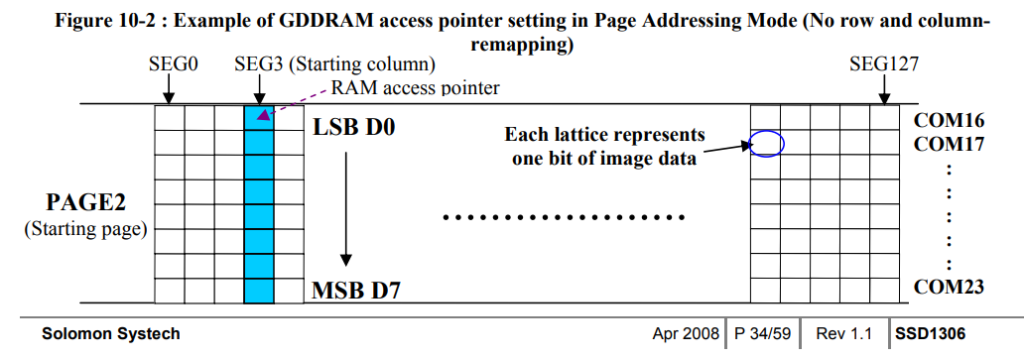
A popular OLED display controller in the maker world is SD1306. There’s a few other similar controller and they all operate similarly until the. The amount of data in a single frame correspond to a smaller display. SD1306 is known to have 128×64 pixels. Once we pull out the data sheet, things will start to fall into place.
The signal type here confirmed with what we saw above.
Although Channel 2 is the Chip Select (Enable), I’m using Channel 3, the Data/Command signal instead. The reason is I’m only interested in the data, not the command. There’s no way to embed the state of another signal into the exported csv. At this point we can only export the data and hope we can find something useful when parsing it.
This figure from the data sheet shows how each byte/bits correspond to the pixel on the screenThis shows the 2 difference way the address increment and roll over. The default is horizontal address mode, we’ll try that first.
In the script I’ve written, it actually parse a combined output from 2 SPI analyzer. I use the Enable signal for “SPI” and Data/Command for “SPI [1]”, then export the table instead of the single analyzer output. The csv looks something like this:
log1_data = ""
columns = []
with open("combined-export.csv") as f:
    while line := f.readline():
        data = line.rstrip("\n").split(',')
        if line[0] == 'n': # skip the first line
            print('')
            continue
        if data[0] == '"SPI"': # Skip the commands
            continue
        if data[1] != '"result"': # We only wants the data
            continue
        c = int(data[4], 0)
        # construct the "pixels"
        pixels = \
          f'{"█" if c&0x80 else " "} ' \
        + f'{"█" if c&0x40 else " "} ' \
        + f'{"█" if c&0x20 else " "} ' \
        + f'{"█" if c&0x10 else " "} ' \
        + f'{"█" if c&0x08 else " "} ' \
        + f'{"█" if c&0x04 else " "} ' \
        + f'{"█" if c&0x02 else " "} ' \
        + f'{"█" if c&0x01 else " "} '
        columns.append(pixels)
new_columns = []
pixels = ""
print(len(columns))
for j in range(0, len(columns)-(128*7)): # 128 columns, we need to take out the last frame
    for i in range(int(64/8)-1, -1, -1): # 64 pixels high, convert to pages in bytes, scan in reverse order
        pixels += columns[j+i*128]
    pixels += '\n'
display(HTML(f'<pre style="font-size: 3px">{pixels}</pre>'))
The code basically construct the pixels using █ (unicode character) by using bitwise and operator to test each bit. Let’s say”c” is 0x12, which equals to 0b00010010, then for the lowest 2 bits, c & 0x01 = 0x0 and c & 0x02 = 0x02. Non-zero value is True in python, so █ (black pixel) is returned while False will result in space (white pixel). Putting that together, 0x12 or 0b00010010 will result in pixel = “ █ █ “.
After converting the data into “pixels”, we then need to find the right order to “print” mimicking the way SD1306 display controller is displaying it. Once the order is right, some sensible characters should start to appear.
Output from jupyter. The first and 2nd frame of the display is visible, and it looks like the display is scrolling up.This shouldn’t be too hard to spot as we scroll down the frames
Initially the flag didn’t work for me when I entered. So I got my teammate to help, turn out the “g” is actually “9”. I was fooled by this, because I know very well that in small display with limited pixels, there’s no space for the lower part of the characters, hence “g” is always raised and looks like “9”, I was blinded by my own experience!!!
Discovery
Enemy troops are approaching. There’s no time to locate the plane. Help us in tracking them down.
This is the only hardware challenge that doesn’t involve Saleae. When we start the service provided, there’s 2 endpoints provided. First one was a HTTP page which prompts for login with “appweb_control_panel” as it’s realm and uses HTTP Digest for authentication. The 2nd one when connected through netcat, will response with AMQP read error when I input random strings. This is indicative of an IoT setup.
As I dug deeper into the AMQP endpoint, I found out it’s running RabbitMQ v3.8.2. I don’t have much experience with AMQP but my experience with MQTT is somewhat useful here. I know I need to find a client to test this, so I found rabtab then I’m stuck with authentication error. After looking into Wireshark’s capture, it’s indicative that I got the connection right, and no known easy to break CVE for RabbitMQ v3.8.2. I went back to the HTTP endpoint, after spending a day on it, I know I’m no expert in breaking that and I don’t believe brute force is the intended way, so I called for help.
One of my teammate who’s a pentester took a look, and found a known vulnerability, turn out this is a HTTP webserver running on IoT device. The exploit requires running a python script to get a session cookie. After setting the cookie, the control panel page reveal itself. Containing 2 password hash. The teammate decoded the first hash and told me the 2nd one is not a known hash.
The hash decodes into anthony_davis:winniethepooh
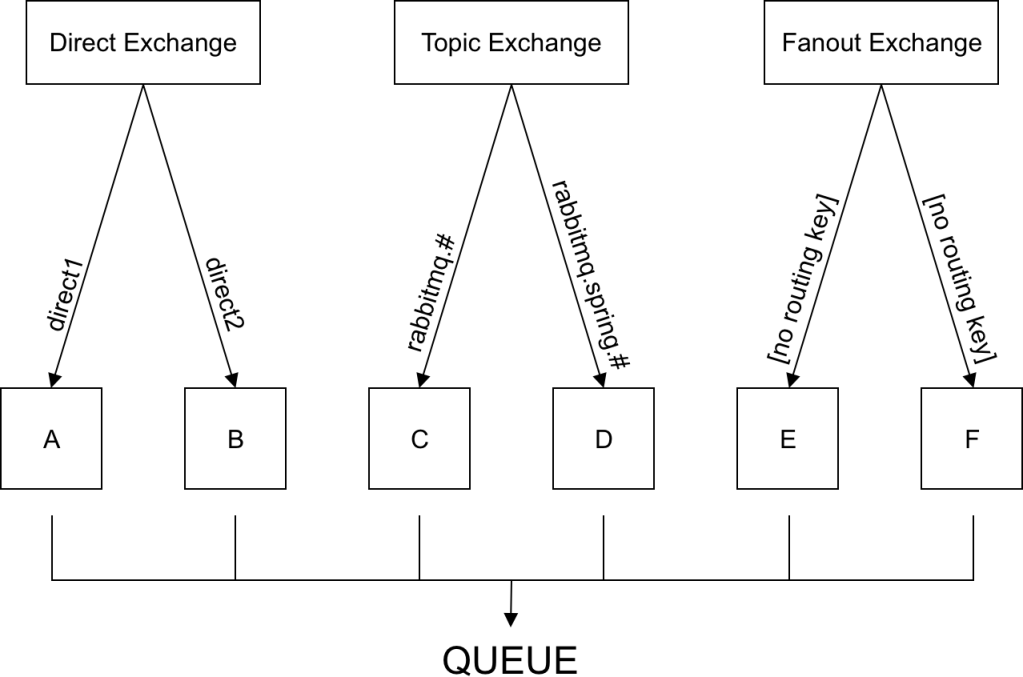
There’s nothing else on the page, so I took the username/password and tested it on the AMQP endpoint, and it works, so I proceed to explore how AMQP broker/exchange works. From my experience with MQTT, I know there should be wild card or global channel I can subscribe to, to listen in on all the messages.
I tried direct using rabtap tap -v amq.direct: nothing came up. I proceed to create a new queue and listening to it while publishing a message, to understand what’s needed to get it working, especially the listening part. Turn out the topic is define as {exchange/built-in keyword}:{queue} so I proceed to try rabtap tap -v Base:# . “Base” as indicated as the exchange on the control panel for topic type exchange. A few messages started showing up.
DEBUG[0008] subscribe: messageReceiveLoop: new message {AmqpMessage:0xc0000cc280 ReceivedTimestamp:2021-04-24 00:30:58.013398051 +0800 +08 m=+8.679805834}
------ message received on 2021-04-24T00:30:58+08:00 ------
exchange.......: Base
routingkey.....: control_panel.stagingcp.htb
Name: CHTB{1_h4v3_n0_n4m3_@_@}
This took me the longest time, and being clueless on the get go, but I learn a lot about HTTP Digest and AMQP 🙂
Hidden
We found a set of devices connected to our serial network that are transmiting encrypted messages. We believe that some of them are still active in our network and thus we captured a sample trace for analysis. The firmware from the devices we already removed will help you with your mission
Now this is a really hard one, involving a binary a.k.a firmware, encryption and serial signal. The signal is straight forward, 57.6kb, 7 Bits per Frame, 1 Stop Bits and no Parity Bit.
Wow, the flag is there, so that’s it??? No so easy
The firmware is a 32 bit ELF for Arm
$ file firmware
firmware: ELF 32-bit LSB executable, ARM, EABI5 version 1 (SYSV), dynamically linked, interpreter /lib/ld-linux-armhf.so.3, for GNU/Linux 3.2.0, BuildID[sha1]=572cbaa2da38724b97a40ec009c2e5b4ca452be4, not stripped
Looks like a Raspberry Pi executable and since it’s 32-bit, should be for Pi 1 or 2 only. I have a Pi 3 running OctoPrint attached to my 3D printer, so I did a quick test executing there, it won’t run. I also tried disassembling the executable, I don’t feel happy going down the asm route. So I dig out my old Pi Model B (v1), lucky I had one with Wi-Fi already configured, so a quick SSH and it execute fine, but nothing happened. I then tried running it on gdb on the Pi, it exits peacefully. Since this is related to serial, after a few tinkering, turn on it accept the serial port /dev/ttyAMA0. I then hook up an USB Serial Port and write up the TX on ttyAMA0 to the RX of ttyUSB0, voila, I see the similar looking cryptic message:
# From firmware:
kE ag ma kd md pO EJ dO IF gp gL gI dJ kC Ig nJ hC gk nm FE nk pk EL da Eb Op JF pg aO dC pI hp Om Om Ep aC hd bd hF pF Jd EL ab bh EF gC dk ka Fn gn
# From serial capture:
kE ag nm kd md IO dI aI JL bp bJ Fp EL nC JI pO aC bJ pa gC kp IJ dJ EE Fp JJ Oa Ig CE aa Og aJ Jn pC gg hh aa dg Ed Ia Oa dJ bp hh EE ba Ep na CE gn
It’s clear that the first 5 characters and the last is the same, corresponding to CHTB{....}. There’s 50 characters in the flag, it matches the 50 pairs of letters in the serial capture. Assuming the firmware is sending what we saw in the hex dump, the strings of A, looks like an encryption with rotating keys. I later realized I could edit the firmware and try execute it, so I tested replacing the last A with B, and then C and then replacing all the A with B and later C. The serial output changes in a weird order.
For the last character, not including CHTB{....} , going from A to D, it changes from Fn -> FO -> Fp ->FI . If I replace all the A(s):
CTHB{AAAAAAAAAAAAAAAAAAAAAAAAAAAAAAAAAAAAAAAAAAAA}
kE ag ma kd md pO EJ dO IF gp gL gI dJ kC Ig nJ hC gk nm FE nk pk EL da Eb Op JF pg aO dC pI hp Om Om Ep aC hd bd hF pF Jd EL ab bh EF gC dk ka Fn gn
CTHB{BBBBBBBBBBBBBBBBBBBBBBBBBBBBBBBBBBBBBBBBBBBB}
kE ag ma kd md pn Ek dn Ig gm gI gL dk kb IF nk hb gJ np Fh nJ pJ EI dd EC Om Jg pF an db pL hm Op Op Em ab ha ba hg pg Ja EI aC bE Eg gb dJ kd FO gn
CTHB{CCCCCCCCCCCCCCCCCCCCCCCCCCCCCCCCCCCCCCCCCCCC}
kE ag ma kd md pm EL dm Ih gn gJ gk dL ka IE nL ha gI nO Fg nI pI EJ dC Ed On Jh pE am da pk hn OO OO En aa hb bb hh ph Jb EJ ad bF Eh ga dI kC Fp gn
CTHB{DDDDDDDDDDDDDDDDDDDDDDDDDDDDDDDDDDDDDDDDDDDD}
kE ag ma kd md pL Em dL Ia gk gO gn dm kh Id nm hh gp nJ Fb np pp EO dF EE Ok Ja pd aL dh pn hk OJ OJ Ek ah hg bg ha pa Jg EO aE bC Ea gh dp kF FI gn
CTHB{EEEEEEEEEEEEEEEEEEEEEEEEEEEEEEEEEEEEEEEEEEEE}
kE ag ma kd md pk En dk Ib gL gp gm dn kg IC nn hg gO nI Fa nO pO Ep dE EF OL Jb pC ak dg pm hL OI OI EL ag hh bh hb pb Jh Ep aF bd Eb gg dO kE FJ gn
This shows the encryption is applied per character, but there’s a different seed per position and possibly a different key. I wasn’t keen on going down this path. So I took a different approach using automation. I figured out that I could patch the firmware using dd, and also log the serial output using screen on the Pi. So I whip up a quick script to iterate through all 95 printable characters.
The script above will generate patch.txt with 44 repeating characters, patch the firmware, upload to the Pi and execute it then repeat for each printable characters. I then have another SSH session running screen -L -Logfile data.txt /dev/ttyUSB0 57600,cs7 . Each execution of firmware will send 400 characters through the serial port. There’s no termination, so I had to splice data.txt by length to parse and create my lookup table
with open(data.txt) as f:
    datas = f.read()
lookup = {}
def extract_msg(data):
    msg = []
    c2 = ""
    i = 0
    for c in data:
        if c == '@': # skip the @ filler
            continue
        i += 1
        c2 += c
        if i % 2 == 0: # group by 2 chars
            msg.append(c2) # store as a list, so we can lookup based on the position later
            c2 = ""
    return msg[5:-1] # I'm only interested in the 44 chars in the flag

for i in range(32, 127): #0x20 to 0x7f
    string = ''.join([ chr(i) for _ in range(44)])
    flag = 'CTHB{' + string + '}'
    index = i-32 # index starts from zero
    data = datas[index*400:index*400+400]
    msg = extract_msg(data)
    lookup[chr(i)] = msg
    print(f'{flag} -> {msg}')
Now the lookup table is ready, time to decrypt!!!
enc = 'IO dI aI JL bp bJ Fp EL nC JI pO aC bJ pa gC kp IJ dJ EE Fp JJ Oa Ig CE aa Og aJ Jn pC gg hh aa dg Ed Ia Oa dJ bp hh EE ba Ep na CE'.split(' ')
for i in range(len(enc)):
    c = enc[i]
    for k,v in lookup.items():
        if c == v[i]:
            print(k, end='')

# output:
# 10w_13v31_f12mw4235_741ks_70_h42dw423_!@3418
Alien Camp
The Ministry of Galactic Defense now accepts human applicants for their specialised warrior unit, in exchange for their debt to be erased. We do not want to subject our people to this training and to be used as pawns in their little games. We need you to answer 500 of their questions to pass their test and take them down from the inside.
This is a straightforward substitution puzzle but with short timeout. An endpoint was given, it will show this through netcat
Alien camp 👾

1. ❓
2. Take test!
> 1

Here is a little help:

🌞 -> 55 🍨 -> 28 ❌ -> 80 🍪 -> 64 🔥 -> 71 ⛔ -> 31 🍧 -> 88 👺 -> 68 👾 -> 42 🦄 -> 3
When entering “1” it will show a random emoji to number substitution. Entering “2” will prompt with the question:
You must answer 500 questions. You have only a few seconds for each question! Be fast! ⏰

Question 1:

👺 + 👺  = ?
Answer:
It’s kinda obvious that a lookup table and a math parser is needed, so I went writing the script
import socket
import time

HOST = '139.59.190.54'
PORT = 31748

def recvall(sock):
    BUFF_SIZE = 4096 # 4 KiB
    data = b''
    while True:
        part = sock.recv(BUFF_SIZE)
        data += part
        if len(part) < BUFF_SIZE:
            # either 0 or end of data
            break
    return data

def get_answer(data, lookup):
    q = data.decode('utf8').split('\n')[5]
    print(f'q = {q}')
    for k,v in lookup.items():
        q = q.replace(k, str(v))
    q = q.replace('= ?', '')
    print(f'q = {q}')
    return eval(q) # lazy math parser ;p

def get_lookup(data):
    lookup = {}
    lines = data.decode('utf8').split('\n')
    for line in lines:
        if '->' not in line:
            continue
        symbols = line.strip().split(' ')
        print(symbols)
        for i in range(0, int(len(symbols)/3)):
            if symbols[i*3 + 1] != '->':
                print(f"something wrong: {symbols[i*3:i*3+3]}")
            else:
                key = symbols[i*3]
                if key not in lookup:
                    lookup[key] = int(symbols[i*3+2])
    return lookup

with socket.socket(socket.AF_INET, socket.SOCK_STREAM) as s:
    s.connect((HOST, PORT))
    data = s.recv(1024)
    print('Received', repr(data))
    s.sendall(b'1\n') # 1 for the lookup pattern
    time.sleep(1)
    data = recvall(s)
    print(data.decode('utf8'))
    lookup = get_lookup(data)
    print(lookup)
    time.sleep(0.1)
    s.sendall(b'2\n') # 2 to start the question
    time.sleep(0.1)
    data = recvall(s)
    print(data)

    print(data.decode('utf8'))
    for i in range(0, 500):
        a = get_answer(data, lookup)
        print(f'a = {a}')
        time.sleep(0.1)
        s.sendall(f'{a}\n'.encode('ascii'))
        time.sleep(0.1)
        data = recvall(s)
        print(data.decode('utf8'))
Once I got the flow working, just sit and wait for it
Question 500:

🔥 * ❌ * 🦄 + 🍨 + 🦄 + ❌  = ?

Answer:
q = 🔥 * ❌ * 🦄 + 🍨 + 🦄 + ❌  = ?
q = 71 * 80 * 3 + 28 + 3 + 80
a = 17151

Time: 0.27
Correct! ✔
Congratulations! 🎉
You are one of us now! 😎!
Here is a 🎁 for you: CHTB{3v3n_4l13n5_u53_3m0j15_t0_c0mmun1c4t3}
Input as a Service
In order to blend with the extraterrestrials, we need to talk and sound like them. Try some phrases in order to check if you can make them believe you are one of them.
This a fun one to play, the typical vulnerable inputon python2.7. I managed to print the script using open(__file__).read()
 #!/usr/bin/python2.7
from sys import version
'''
Descr:
In order to blend with the extraterrestrials, we need to talk and sound like them. Try some phrases in order to check if you can make them believe you are one of them.
'''
def main():
    print version + '\nDo you sound like an alien?\n>>> \n'
    for _ in range(2):
        text = input(' ')
        print text
if __name__ == "__main__":
    main()
After that I try to find ways to execute os.listdir but I wasn’t able to do any import as apparently import don’t work with eval. I knew I could just try read flag.txt but I like to learn the internal of python rather than doing brute force.
 Traceback (most recent call last):
  File "/app/input_as_a_service.py", line 16, in <module>
    main()
  File "/app/input_as_a_service.py", line 12, in main
    text = input(' ')
  File "<string>", line 1
    import os
         ^
SyntaxError: invalid syntax
I ask my colleagues for ideas, and my lead suggested __import__("os").listdir("/app")
2.7.18 (default, Apr 20 2020, 19:51:05)
[GCC 9.2.0]
Do you sound like an alien?
>>>
__import__("os").listdir("/app")
1+1

2.7.18 (default, Apr 20 2020, 19:51:05)
[GCC 9.2.0]
 ['input_as_a_service.py', 'flag.txt']
 2
Do you sound like an alien?
>>>
open('/app/flag.txt').read()
1+1

 CHTB{4li3n5_us3_pyth0n2.X?!}
Learnt something about __import__ today, and this will be helpful for the next challenge, or maybe not….
Build yourself in
The extraterrestrials have upgraded their authentication system and now only them are able to pass. Did you manage to learn their language well enough in order to bypass the the authorization check?
This one is a big level up from the previous python2 challenge. It’s python3 and __builtins__ where patched with None. A quick test to bring out the error message. Sadly I forgot to dump the script once I managed to get through with this.
3.8.9 (default, Apr 15 2021, 05:07:04)
[GCC 10.2.1 20201203]
[*] Only 👽 are allowed!
>>> a
Traceback (most recent call last):
  File "/app/build_yourself_in.py", line 16, in
    main()
  File "/app/build_yourself_in.py", line 13, in main
    exec(text, {'__builtins__': None, 'print':print})
  File "", line 1, in
TypeError: 'NoneType' object is not subscriptable
3.8.9 (default, Apr 15 2021, 05:07:04)
[GCC 10.2.1 20201203]
[*] Only 👽 are allowed!
>>> print('')
⛔ No quotes are allowed! ⛔
Exiting..
This is a lot harder without __builtins__ and quotes. Again I went asking for ideas, but this time my housemate, who’s also a python expert. He tinker around and gave me an idea to boot, print((1==1).__class__.__mro__[-1].__subclass__())
Looks like we’re heading somewhere. Now I need to construct a string from "<class 'object'>" there’s an ‘o’ and ‘s’ in there, lol. This is the step by step output before I show the complete solution
I’ve learn so much about __mro__, loadmodule and io.read. Wouldn’t have done so without the constrain imposed by the challenge.
Robotic Inflitration
We were able to hack a robot that was operating at a target facility and log its readings using ROS. The robot has an advanced lidar scanner, and these readings should allow us to rebuild the plan for the facility, and will be essential for the next steps of our mission. drive.google.com/file/d/168_fK5H_ZFwIg-fA4iZ_1XAWB3Vg3obR
This is another fun challenge, it’s actually no hard if you already know about ROS and lidar, which is the 2 things I wanted to get my hand on, what a good chance to try it out. The challenge provide a ROS bag file.
I started out by installing ROS on my personal Arch machine and ran into a lot of dependency issue and wasn’t sure which version work best. I also tried reading the bag file in jupyter, it manage to get the velodyne data out, but I have no clue where to go. From my experience, most of the tools targeting the scientific communities are usually well package and usually works out of box. So I decided to spin up a VM and follow the official ROS installation guide.
There’s 3 version to choose from, each recommend a different Ubuntu version. ROS Kinetic is supported until April 2021, so it’s out, while ROS Noetic is release in mid 2020, recommending Ubuntu 20.04, seems like a good option. For some reason based on my experience with this CTF so far, I felt that they will stick with slight old and support version, for example executable for older Raspberry Pi and RabbitMQ version from end of 2019. So I went with ROS Melodic + Ubuntu 18.04.
The installation guide “just works” 🙂 We also need to install the package for velodyne.
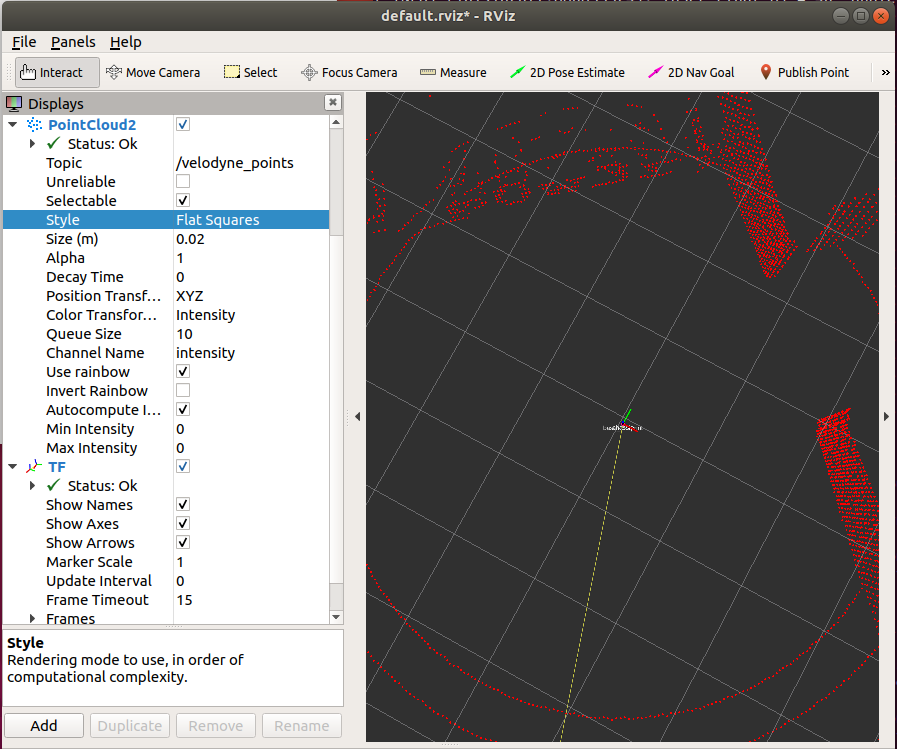
When I saw Velodyne LIDAR was involved, I had a feeling the flag will be somewhere in the LIDAR scans. After following the tutorial on how to play back bag file, I need to find a way to visualize the LIDAR scan and it turn out wasn’t too hard. After a few search on ROS forum, I came to know about rviz and after some tinkering with the settings, I found PointCloud2, which is the message type from the bag file. Follow the playback guide, I need to start the roscore daemon, and then the visualizer rosrun rviz rviz -f velodyne . Then add PointCloud2, and select the topic /velodyne_point. TF are optional, but can be useful. Then followed by playing back the bag file. I went through the scans animation and found the flag around 200 seconds into the play back. So I restar the play back from there: rosbag play capture.bag -s 200 -l
PointCloud2 pointing to /velodyne_pointsThe scan wasn’t very clear, so some guess work required, CHTB{r0s_1s_r0b0t1c_p0w3r}
Alienspeak
We were able to hack a robot that was operating at a target facility and log its readings using ROS. The robot has an advanced lidar scanner, and these readings should allow us to rebuild the plan for the facility, and will be essential for the next steps of our mission. drive.google.com/file/d/168_fK5H_ZFwIg-fA4iZ_1XAWB3Vg3obR
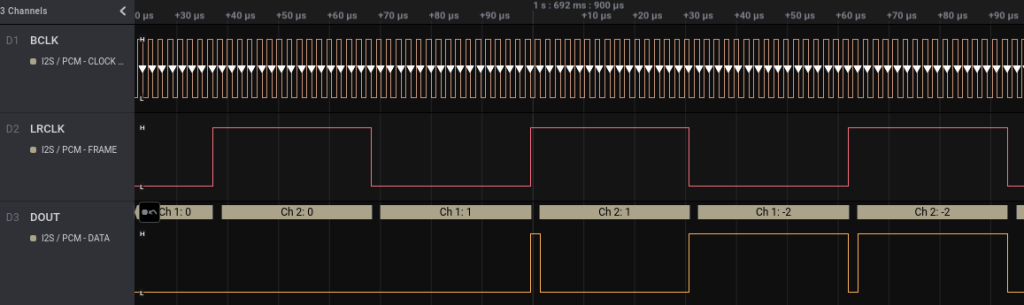
This one actually involved hardware I2S capture. The channels are labeled with BLCK, LRCLK and DOUT. No guess work required. A jupyter notebook alient_asr.ipynb was provided, how convenient. The code uses a pre-trained ML model to decode the audio capture from I2S, with some limitation, of course. It does look easy from the start.
The I2S capture. The LRCLK is indicating if the data is left or right channel
After exporting the I2S capture into csv file, I found this tool to convert the csv into wave file.
from PCM2Wav import *
output = PCM2Wav(PCM2Wav.saleae.I2S, "i2s-export-signed.csv", "i2s-export.wav")
There’s a few errors from PCM2Wav , basically we need to configure the I2S analyzer to export the values as signed decimal. Next is to look into code, I saw this comment inside the notebook
# builds a spectrogram out of the waveform (using a short-time fourier transform)
# can handle at most 16000 samples = 1 second
...
# currently only classifying phonemes separately
# TODO: make it work with a whole sentence
Looks like we need to chop the wave file
Open the wave file in AudacityThe source of the clicking noise, could be a conversion error and doesn’t look like white noise.
When I plaedy the audio, there’s a lot of clicking noise but the audio is clear enough. Each part of the character is clearly separated, and we need to limit to 1 sec according to the code. I also need to down sample the stereo wave into mono, as the code only accept 1 channel. As usual, I never liked to do manual work, so I eye ball the audio interval and do a quick script to slice the audio file.
from pydub import AudioSegment
newAudio = AudioSegment.from_wav("i2s-export-mono.wav")
time = [0, 900, 1900, 2800, 3700, 4700, 5500, 6500, 7500, 8400, 9200, 10100, 11100, 12100, 13000, 13900, 14900, 15800, 16700, 17600, 18600, 19450, 20400, 21400, 22200, 23200, 24100, 25000]
for i in range(0,26):
    partAudio = newAudio[time[i]:time[i+1]]
    partAudio.export(f'i2s-export-{i}.wav', format="wav")
That give us 26 segment to decode, lastly the ML classifier
# currently only classifying phonemes separately
# TODO: make it work with a whole sentence
flag = ""
for i in range(0,26):
    char_class = classify_phoneme(f'i2s-export-{i}.wav')
    flag += char_class
flag
Voila…err, nope, the flag is gibberish. This is were the challenge begin. Remember the clicking noise I was talking about, it’s interfering with the classifier. So I need to clean it up. I did a quick run using the Noise Reduction and having the audio slicing script was really handy. Rerun everything and, nope still gibberish, it’s slightly better. I think I got CCTB. I forgotten to try the Click Removal feature in Audacity, which might have worked. But I took a different approach.
By looking at the wave pattern, the click is quite obvious that it’s a “math” problem. It’s common to encounter this if the ADC/microcontroller wasn’t configured properly resulting in integer rollover of the data when the peak is reached. So I decided to write a simple filter to fix the “click”. It’s like a moving average, with a small 3 slot buffer, but only apply the average when the center value deviate too much. I tried with 1000 and it hit the jackpot
with open("i2s-export.csv") as f:
    i = 0
    with open(output, 'w') as o:
        l = [0, 0, 0]
        r = [0, 0, 0]
        while line := f.readline():
            line = line.strip()
            data = line.split(',')
            if line[0] == 'T':
                print(line)
                continue
            if data[1] == "1": # Left
                l[2] = l[1] # shift the buffer
                l[1] = l[0] # shift the buffer
                l[0] = twos_complement(data[2], 16)
                avg = int((l[0] + l[2]) /2)
                if avg - l[1] > 1000:
                    l[1] = avg
                if i > 3:
                    o.write(f'{data[0]},{data[1]},{l[2]}\n')
            elif data[1] == "2": # Right
                r[2] = r[1] # shift the buffer
                r[1] = r[0] # shift the buffer
                r[0] = twos_complement(data[2], 16)
                avg = int((r[0] + r[2]) /2)
                if avg - r[1] > 1000:
                    r[1] = avg
                if i > 3:
                    o.write(f'{data[0]},{data[1]},{r[2]}\n')
I made a mistake when checking the average, should have added abs to take the positive and negative as well, but hey, it worked, the wave is much cleaner, so I didn’t go back and update the script 🙂
CHTB{4L13N5_<3_34R7H_MU51C
Getting to play with a half done ML is quite fun, it’s also something I intended to learn more in the future.
Closing
I really enjoy participating in this CTF especially the hardware challenges, which was rare with the CTF I’ve tried before. I also like the fact that I can solve the challenges without using brute force. We just need to think like the challenge creator. Using brute force feels like not respecting the effort put into creating the challenge.
There’s many approach to solving problems, we should always play it to our strength
This is the second part of a multiple part series about some hardware & software that I hacked together to monitor the AC current of our outdoor aircon unit. This part I’ll be discussing how I’ve established the hardware parts selection for this project, which are SCT013 Current Sensor, SAR ADC, thermistor, Gertduino, and Raspberry Pi Model B (rev 1).
Part 2 – The hardware – current sensor, thermistor, ADC& Arduino (You’re reading this)
Part 3 – The circuit design – Analog, digital and data flow
Part 4 – The firmware – Arduino, RMS calculation & Raspberry Pi’s UART
Part 5 – The software – data collection, analysis & decision
Part 6 – The solution – still unknown at this stage
To achieve what I outlined in Part 1, which the aircon is reporting overcurrent during a hot day, I’ll need to measure the AC current and the temperature continuously over time. To be able to capture the peak current, the time resolution would have to be reasonably small. Preferably multiple times within a single cycle of our AC here at 50Hz. The hardware should also be remotely accessible, hence Wifi connection is a must 🙂
AC current sensor
To measure AC current safely, I’ve already had a YHDC SCT-013-000, 100A model which should work well for this. So that’s settled. OpenEnergyMonitor project site has a good report on it and various tutorials on using it.
ADC (Analog-to-Digital Converter)
I wasn’t sure how much current I needed to measure. Considering the aircon is on a 15A plug, a range of 15A should be more than sufficient. The ATmega328P on the any of the Arduino board I have only had 10-bit ADC, which for a scale of 15A, I can get about 15mA of resolution. Typically analog circuits are going to be noisy, plus the noise from the switching power supply of the Pi, I’m going to lose 1 bit if I’m lucky, and likely 2 or more bits. That gives me a resolution of 58~117mA. Assuming if the aircon is drawing at 2A at equilibrium, that only gives me about 34 counts out of 8-bit. Designing a low noise circuit is going to be hard when using a perfboard.
I could upgrade to the built-in 12-bit ADC in Redbear DUO, which would give me a much more comfortable 136 assuming effective 10-bits. Since it’s a 3.3V board, I would have less room to work with on the analog front end using op-amp. If I choose to lower the max current, then I might not be able to capture the peak I intended. In the end, I decided to go with an external ADC, giving me more leeway in the design. As for the sample rate, I wanted to get a decent RMS current measurement, most material I could find online suggest at least 1000 samples/s. I decided to do 5000 samples/s, which gives me 50 samples per half cycle, that should be more than enough for the RMS calculation.
Since I don’t have any ADC here, so I sign up for Element14 Singapore. Fun fact, Element14 Malaysia and Singapore shared the same backend system. How I know? I can’t reuse my username from Malaysia ;). I looked for an ADC that runs on 5V with at least 14 bits and faster than 5ksps. Sorted by price, I found ADS8317 from TI, 16-Bit, 250kSPS SAR converter.
In the past I’ve always stayed with Sigma-delta converter, mainly for it’s linearity and higher resolution. For this, I needed something faster, accuracy is not as important, but the resolution is. So using SAR converter allows me to play with something new while having a bit of challenge.
A good challenge will give a better satisfaction at the end 🙂 I’ve also learnt that this particular SAR converter supports “short cyling”, which you can stop the converter once you have enough significant bits to know that you can skip the rest. The converter works in “successive-approximation”, it produces the bits as you read it. If you stop reading, it stop as well, hence “short” cycling. Although I don’t use this feature here, but it’s an interesting concept to learn, that save time and power whenever you know you don’t need the full 16-bits.
Temperature Sensor
I also wanted to hook up a few temperature sensors to monitor the outside temperature and the temperature near the compressor. I had a bunch of spare 10K NTC thermistors from my 3D printer, that should do the work with any of PIC/Arduino’s ADC.
Micro-controller/Micro-processor
I’ve been bringing my microcontroller/microprocessor boards from back home (Malaysia) whenever I go back to see my family. So I’m spoiled with choices from simple Arduino boards, plain PICs, ESP8266, ESP32, Redbear Duo, Omega2 to Pine64 & various generations of Raspberry Pi.
I’ve decided on Gertduino, an Arduino board that doubles as a Pi HAT, and Raspberry Pi Model B (the first version). I wanted something that can run python, which requires less effort and can be easily updated remotely while having enough storage to be left alone when I’m busy during the week. It doesn’t need much grunt work, so and older Pi suffice. The outdoor unit is near my housemate’s bedroom window, so a reliable design helps by giving him less interruption.
ESP8266 or Redbear Duo both can achieve the same thing, but I have experienced both crashes in a shorter period than the Pi. Not blaming the hardware, but rather the overall system allowing me to crash it with lousy code. The ESP will also require additional ADC for the thermistors. And I’m not fond of tinkering with C++ code when I do my analysis later. Python works best as I could transfer from Jupyter notebook to python script with little to no modification.
That’s all for this week. I’ve had this sitting in my draft for a while. I recently learnt from Coaching for Leaders that I need to have the “courage to be rubbish”, to keep posting consistently, which is what matters than to make sure everything is perfect. I’ll keep up with posting the next part within the next 2 weeks.
This is the first part of a multi-part series about some hardware & software that I hacked together to monitor the AC current of our outdoor inverter aircon unit, which is reporting an overcurrent error.
Part 1 – The introduction – Why, what & how (you’re reading this)
Part 3 – The circuit design – Analog, digital and data flow
Part 4 – The firmware – Arduino, RMS calculation & Raspberry Pi’s UART
Part 5 – The software – data collection, analysis & decision
Part 6 – The solution – still unknown at this stage
Note: I’ll add the links when those posts are published 🙂
The Why
TLDR; I want to learn about inverter fail-safe features.
I and my housemate have started working from home around mid-March 2020, right before the Circuit Breaker measure imposed by the Singapore government. With the hot season coming, we started turning on the aircon after lunch and we noticed that it wasn’t cold, and would switch off after some time with the power indicator blinking, which usually means something is wrong. After cycling the power it will be back on, and maybe cold again or it might take a few more power cycling. We never noticed this before COVID-19 when we only operated the aircon at night.
Thanks to my housemate who did a quick search and found out how to read the error code, E7 – Inverter instantaneous overcurrent (DC output). After calling Daikin, they suspected the compressor and for this older model, it will cost around S$700~800 (USD500~575) with a labor charge of at least S$500 (USD360). They recommend a new unit instead which costs around the same. After speaking to our agent and landlord, we decided that we don’t mind observing for now and continue using it as is.
After some observation, we noticed that if we turn it on earlier in the day before the sun shines on the outdoor unit, or when the day is gloomy, it works immediately, and on a hot day, it will work earlier then shut down afterward. So it has to do with the heat in the outdoor unit.
My understanding of the error is that the controller wasn’t able to start the compressor within the designed current limit. Daikin is known for its good fail-safe design. When the outdoor unit is trying to start, we could hear the fan start, and the compressor tries to start and stop after a few seconds. It will keep trying for a while before giving up and throw us the error code E7.
I had some experience with aircon servicing and know the internal quite well, but this fail-safe feature is new to me, especially around the inverter. So I thought why not I try to monitor the current and temperature to see what’s causing it to stop while learning more about this fail-safe feature.
Aside from that, I have used a non-intrusive current sensor coupled with OpenScopeMZ to help my previous landlord troubleshoot a frequent power trip, which didn’t work as expected. I end up using a Murata power monitor which is intrusive as it requires the mains wire to run through the permanent current loop. This is a good opportunity to learn and get the current sensor working. I’ve also wanted to understand the RMS calculation for continuous current measurement.
Lastly, this gives me a stronger nudge to restart my blog post. I’ve broken it down into smaller posts so it’s less daunting to start. Hopefully, it will keep the blogging wheel turning.
The What
What should I measure? Since it’s overcurrent, the obvious thing is to monitor the AC current. Although the error indicated overcurrent on the DC output, getting that requires tapping into the controller sitting outside, a big no-no since we live on the 14th floor and the outdoor unit is hanging outside the bedroom window with no easy access. AC current is the closest and safest I could get to. I also happened to have a spare clamp style AC current sensor in my parts bin, which allows non-intrusive current measurement.
The next parameter is the temperature, so I know at which level of heat that caused the overcurrent. I have a couple of spare thermistors from my 3D printer, so that’s taken care of.
The How
I’ll be making a custom Arduino shield on veroboard, put it on a Gertduino and Raspberry Pi. I think this is long enough as the introduction. I’ll dive deeper into the How in the next part. If this is interesting, stay tuned for Part 2, which comes next week.
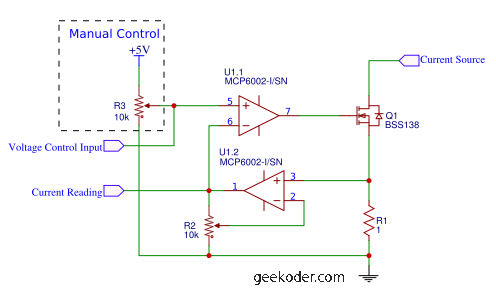
Today I needed to test a new PCB design for a load cell module. In order to evaluate the load response of the excitation circuit, I have to find a way to control the load current while observing the excitation voltage. The load curent needed is less than 20mA.
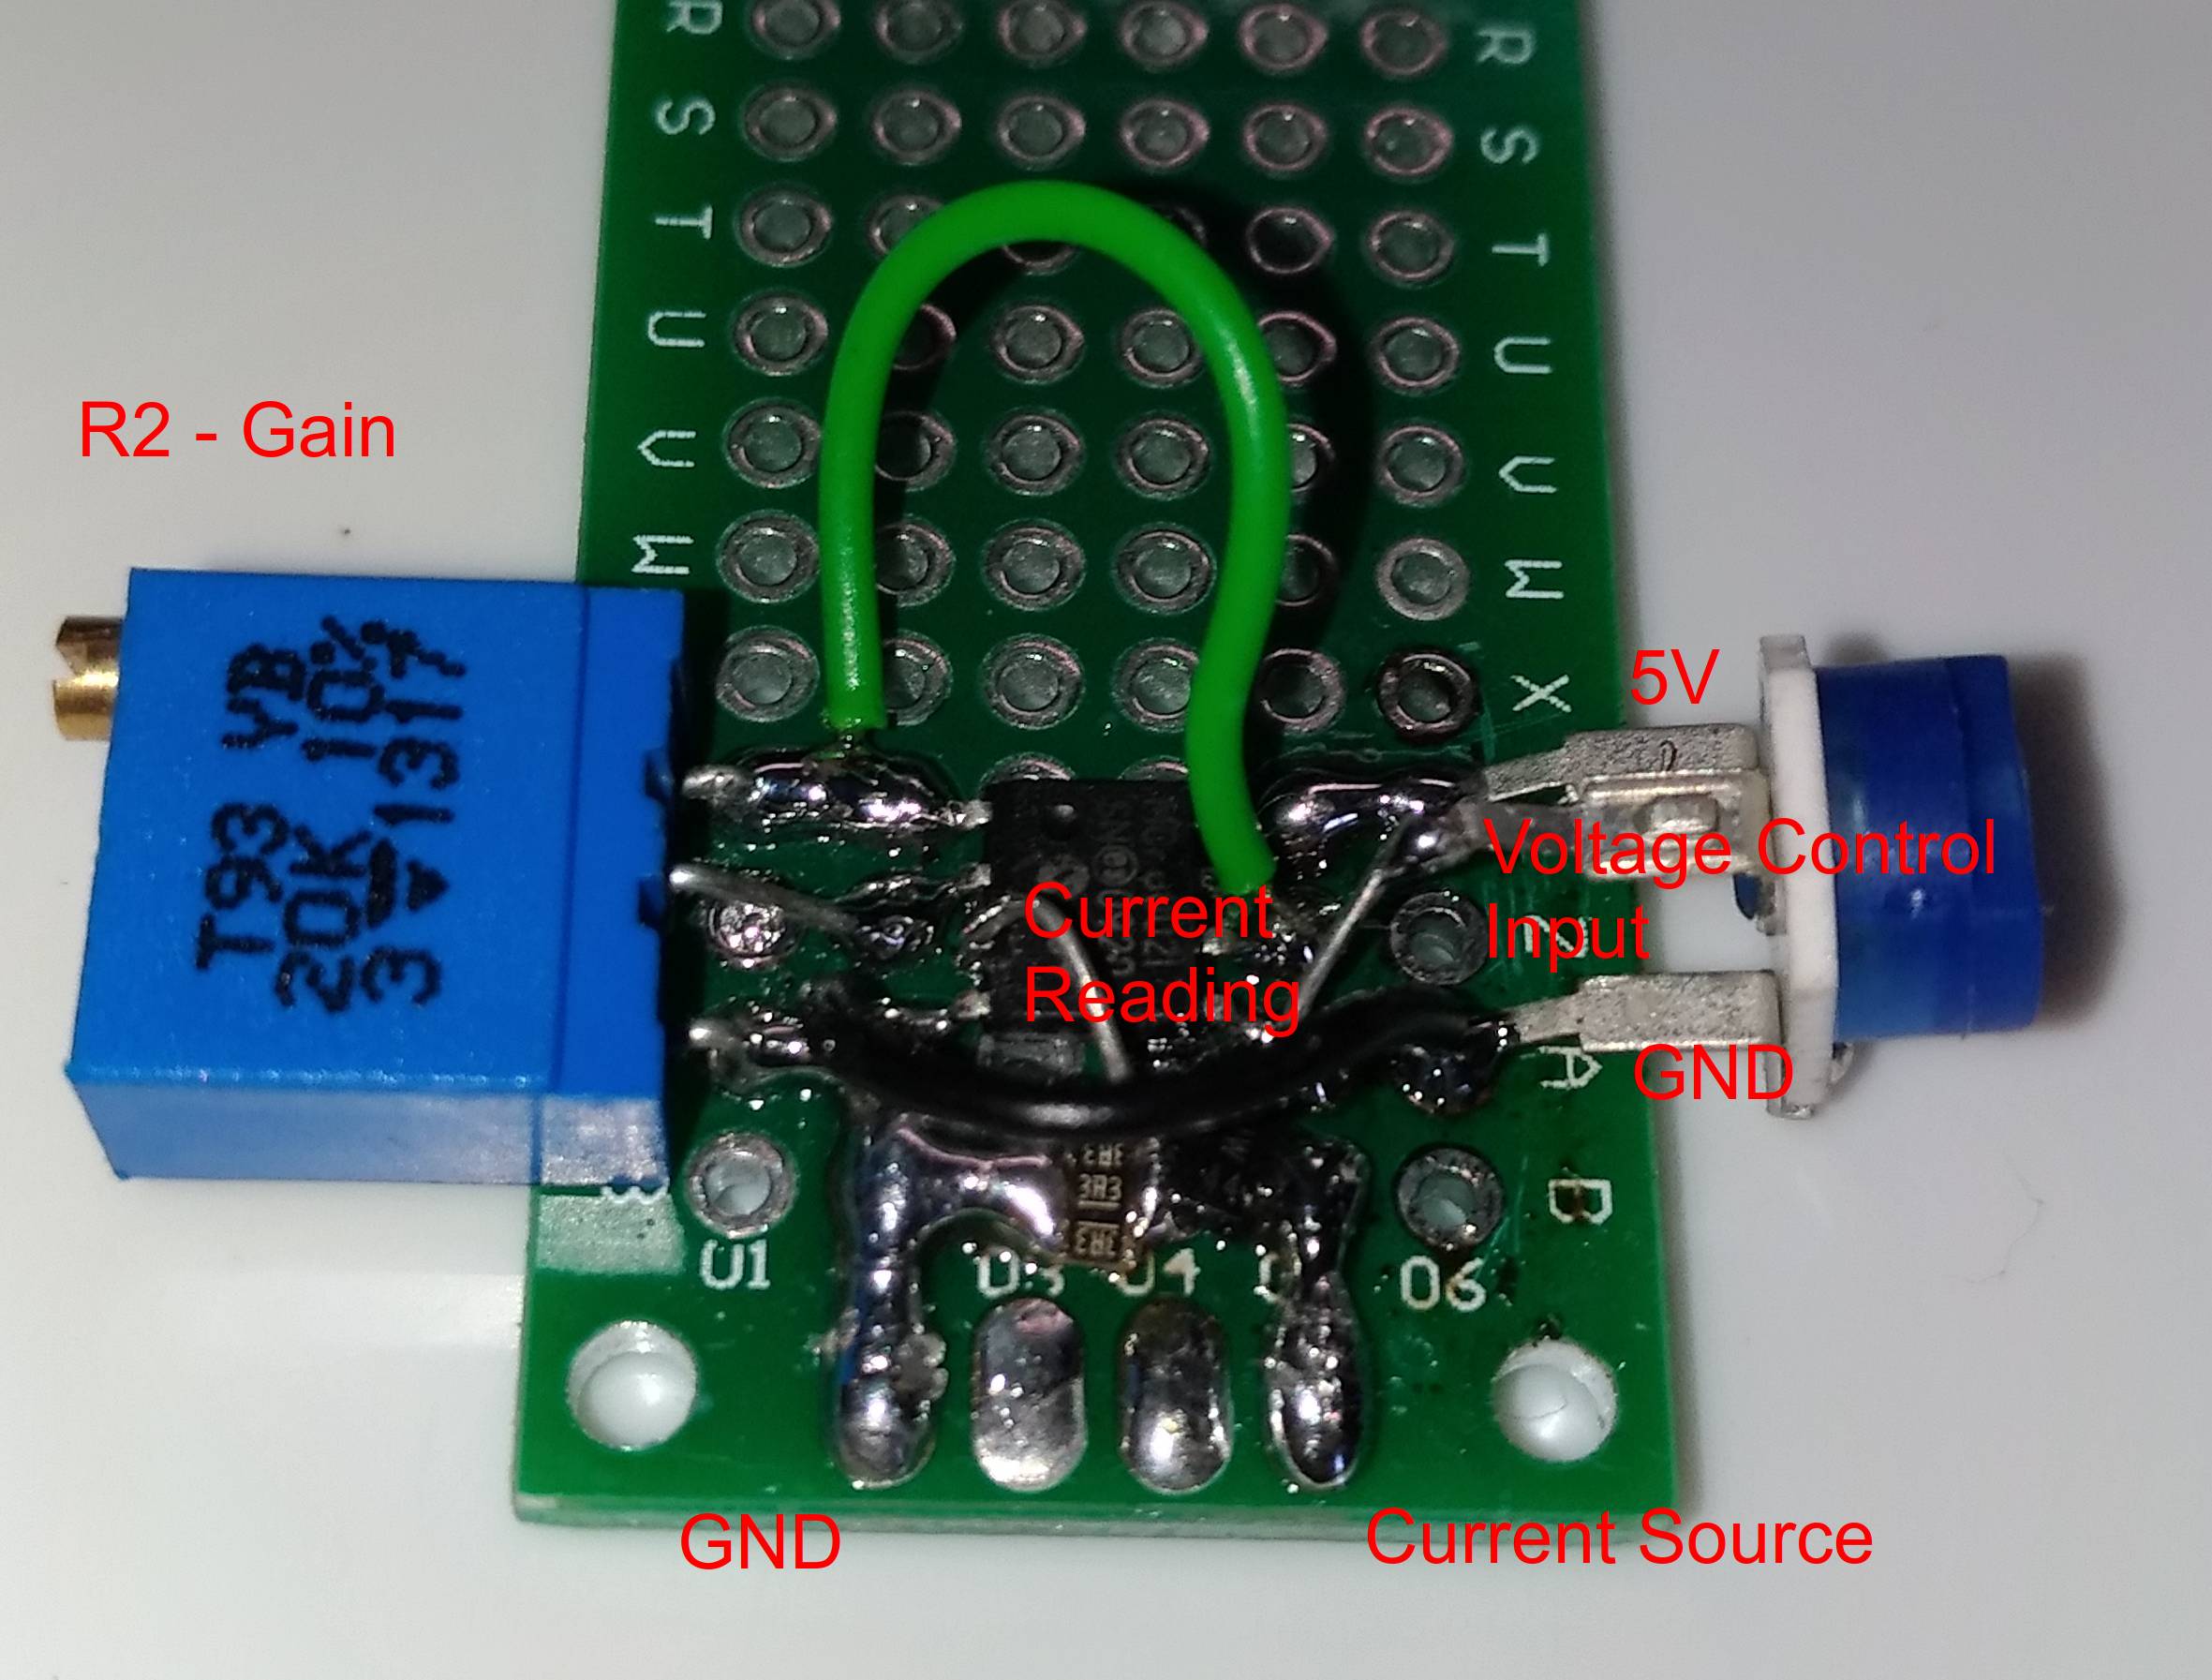
The circuit above was designed for much higher current than I need. I also need to read the current. I decided to stay with a 50mA range which coincide nicely for the 5V supply that I’m using with a gain of 0.1V/mA, 5V output = 50mA.
I’m using MCP6002 since it’s cheap and I have plenty of them. It’s not a very precise opamp but precision is not a requirement for me. What’s more important is the rail-to-rail input/output. The high input offset does cause some issue when the control input is near zero or 5V. R2 will help set the gain and the ratio for the current reading. R3 is used when I was testing to make sure everything works as expected.
I prototyped this on a 2 sided perfboard and then hooked up to Analog Discover 2 to make use of it’s waveform generator and oscilloscope to verify my excitation circuit.
I’ve been avoiding Samsung’s smartphone ever since my S3 (I9300), mainly because I felt cheated paying a premium for a cheap product. I believe most people would have heard of the famous crack screen on Note(s), crack frames and the eMMC hardware bug. I’m the victim of the latter 2 issues within 6 months of my purchase
I’ve been avoiding Samsung’s smartphone ever since my S3 (I9300), mainly because I felt cheated paying a premium for a cheap product. I believe most people would have heard of the famous crack screen on Note(s), crack frames and the eMMC hardware bug. I’m the victim of the latter 2 issues within 6 months of my purchase. Not to mention the slow catch up of firmware update. After Android 4.2, I’ve since switch to OmniRom for 4,3 and now 4.4 to overcome the dysfunctional Samsung BLE SDK. I needed a working BLE phone to work on a project. Waiting for 4.3 from Sumsung even after a year of it’s Release from Google just seems unreasonable.
Using custom ROM has not only given a new lease of live to my S3, it also improve on the performance and battery consumption, kudos to OmniRom and CyanogenMod team. Though there’s some trade off such as having some weird bug lurking around, i.e. camera disconnected issue. I can live with that. As of right now I’m anticipating Android L for my S3, I stumble across this forum post, hinting of no support for S3
I9300 – No active maintainer
Reading further into the thread then I found this long post of one of the major S3 maintainer. It’s a hour read but it explain a lot of wrong treatment the open source community is getting from Samsung namely violating GPL agreement, last release of source code , and how upper management avoiding a proper fix to existing devices even when the open source developers has submitted patches. It’s heart breaking when this is the result of capitalism.
Based on that post, it really change my view about Sony and Qualcomm, which have been very supportive in releasing their source code so the open source community can catch up properly, and hence their users can enjoy some useful custom ROM. I’ve also learnt that xda-developers is probably the first team to get the source code from various hardware vendor and then distribute to other custom ROM developers. Hence, when XDA lost their hardware maintainer, so would other custom ROM.
TL;DR; No more Samsung smartphone or tablet from now on.
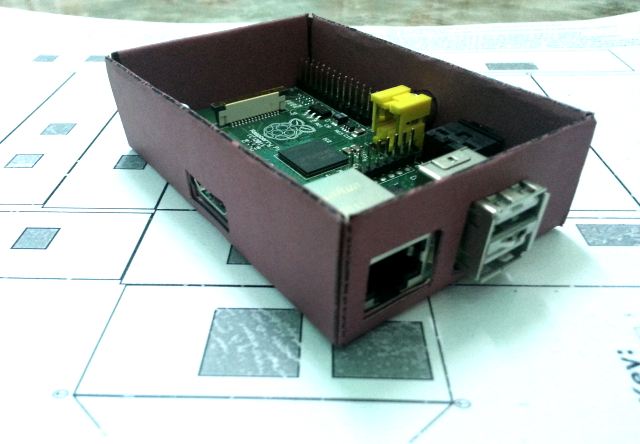
While waiting for a proper Raspberry Pi case from element14 (formerly known as Farnell), I stumble across a site where the author designed a paper case for his Pi and kindly shared it to the world. I gave it a try today, and easily done it in less than 30 minutes.
The design is well done, taking consideration into paper thickness and folding allowance. Bravo!
I was in a discussion with Matthew Yun today, and just realized that the current rating system for product review or rating contains so much noise that the 5 stars system is simply ambiguous to help consumer to decide a product. We were specifically taking about Google Play, but it applies generally to most review or rating system.
I’m a big fan of tower defense games but as it can be seen clearly that nine out of the top ten is 4½ stars. Very seldom we’ll come across a 5 stars games or apps, which makes 5 stars prestigious and rare. On the other hand, vote count is also an important value to consider.
If I’m new to any of the games above, and I don’t mind to try any one of them, which one to pick? The one with lots of votes and most amount of stars right? But how to pick when most of them are 4½ star? I dislike the idea of clicking into every game to read the long list of ambiguous features, watch every demo video and browse through the lengthy reviews. Sometime filtering the useless ones. I rather have a friend to recommend some great games they have played or wonderful apps they have used.
The stars help with the decisions, but not as helpful. The main rating focus is the last 2 stars, while the first 3 are practically useless, at least for games. I would only consider a 3 star app of it has specific feature which I want and I don’t mind the other craps. But at the current competitive market, someone else would definitely write another better app which is at least 4 stars to begin with. This has effectively made the 5 star rating becoming a 2 star system, i.e. 0, ½, 1, 1½ and 2. What’s the use of the rating if it can only differentiate between good and lousy games.
How I wish they’re like IMDB where partial stars are indicated which makes differentiating a 4.1 with a 4.9 easier. This got me thinking of improving the star rating system without taking extra space to show the index. My solution is to split the last star to indicate one fifth of the rating.
Now I would know that is better than by a factor of 4. Now I can start crawling through the details of the former.
UPDATE: Google Play store did have a Average Rating which shows a proper index, but you can only see it on top of the reviews, and not available in Play Store on the phone.
![/(electr[^s]*)|(prog[^s]*)/](https://geekoder.com/wp-content/uploads/2021/04/08deb-geekoder-1.gif?w=275)