Starting a new business – continuous improvement

This is a post about my learning of continuous improvement on our startup.

This week, I’ll share about the continuous improvement we’ve done on our startup and what I learn from it.

Previously, I shared that after updating our landing page for demand validation, we saw the conversion rate doubled and we were quite satisfied with the improvement. Next is to wait until we had enough conversion to move on to the next step. For a while, I was indulging in the “success”, naively of course šŸ˜‰

I grew up with this Chinese idiom stuck in my head: å­¦å¦‚é€†ę°“č”ŒčˆŸļ¼Œäøčæ›åˆ™é€€. It translates literally to “Learning is like rowing a boat upstream, if you don’t keep pushing forward, you’ll fall behind”. I’m also a DevOps advocate, for which continuous improvement is part of the trade. Though for a while, it didn’t occur to me that I need to continuously improve our ads, not until I stumble across the “Experiment” feature of Google Ads. ĀÆ\_(惄)_/ĀÆ

That reminds me of what I saw in our company’s weekly updates, what A/B test was done, its result, and what change was done to improve further. That’s a strong reminder that I also need to continuously improve our business. I’ll go into the why shortly, let’s look at the what for now.

Google Ads Experiment

Google Ads Experiment is a guided and automated step that can also be done manually. I’ve tried both approaches, the limitation of either method is the deciding factor on which to use.

For an experiment, Google Ads can be instructed to apply draft changes that are performing better than before. Those changes can be anything from keywords down to ads wording. The limitation, only one experiment is allowed at a time, but experiments can be queued, making this a useful feature for ongoing improvements.

When done manually, we can either create new Ads Group or Campaign and compare the results ourselves. I went with this to do our branding test because we have 7 brand names to test. Although it’s still possible to use Experiment but testing each brand sequentially might include seasonality bias in the data. We wanted a more accurate data from this test.

Improvement

I set up to run the branding test for 4 weeks, and there’s one week left. I’ll share the result next week. But now we can already observe the improvement from some of the more favorable brands.

The graph includes data 1 week before we started the branding test to provide a before and after comparison

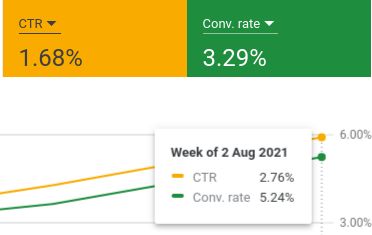
Our CTR grew from 1.16% to 2.76%. That’s the average of all 7 brands. Our top brand actually fetches more than 5% of CTR and we’re just hitting the industry average according to Instapage.Ā 

Our conversion rate goes from 3.36% up to 5.24% and it’s better than the industry average of 4.40%. Our top brand managed to push the number further to 6.19%. I’m really satisfied with the result. But it’s not the time to be complacent.

Why

Although the experiments in this post were about demand validation and branding test, continuous improvement applies to all areas of the business, or any business for that matter.

Every business, no matter who runs it, faces ongoing change. The only constant of business is change. The only constant in life is change.

Mark Cuban
https://www.forbes.com/sites/forbesbusinesscouncil/2021/03/30/embracing-the-one-constant-in-business-change/

The world is changing constantly so are consumers’ needs. Looking at the closing of Speedy Video after 3 decades, while consumers’ needs have changed they continue to serve them the same way. On the contrary, the company I worked in, it’s 10 years old and they never stop improving their customers’ satisfaction, which is why they’re one of the top 3 of their industry right now.Ā 

Changes can also come from the environment, the competitive environment in this case. We’re expecting strong competition after we launch, either from existing players or new ones who saw the same opportunity that we saw. We’re now in the training pool learning our way, hoping that one day we can swim alongside the big players in the competition pool. Without continuous improvement, we’ll be out of the game in no time šŸ˜‰

What’s Next

In the next post I’ll wrap up branding test and share more about biases in business decision and what we can do about it.

Starting a new business

This post is about my foray to start a new business with 2 friends following the lean startups’ methodology and what I learn from it.

This post is about my foray to start a new business with 2 friends following the lean startups’ methodology and what I learn from it.

Recently a very entrepreneurial mentor of mine called to talk about a business idea. This is quite a common type of call I get from him. I see him as a visionary person and someone who can spot a business opportunity from miles away. Most of his business ideas are anything but traditional.

Most of the ideas we discussed are just ideas. Having a business idea doesn’t always mean it will result in a sustainable business. But sometimes through our discussion, some of the ideas spark new insight into other opportunities. This is one that he managed to convince me there’s a real demand for us to supply to. He also convinced a close friend to join us. This partner is an subject-matter-export for the product that we’re trying to create.

Starting Up

Most of the businesses that my mentor started, require him to be on the ground understanding all the intricate details involved and evolving that into what they are today iteratively. But for this new business, it’s going to be 100% online, which is where I can contribute technically. I’ve also worked in a startup going through product-market-fit as well as having read The Lean Startup, or so I thought šŸ™‚

In the first meeting, I was tasked to set the technical direction and ideas on where to “start”. We agreed that it’s a risk if no one needed our product. So that’s the biggest risk that we need to validate before we invest in building the product. Initially, I proposed doing market research to affirm our business idea. Although I’ve read The Lean Startup, I never get to apply the principle of demand validation at the earliest stage. I was lost, but luckily I knew a close friend, Yazid, a design thinking guru who had done this for his highly demanded WagyuBox . He explained how he applied the principle from the book and provided me some ideas to test the demand of our product without actually having the product first!

Demand Validation

So I went ahead and set up demand validation by using Google Ads. Crafting a brief description of what the product is, and then point to a landing page that I whipped up from some free template. On the landing page was a simple form asking for the visitors’ email, for those who want an update when our business is ready to serve.

I didn’t waste too much time setting up the best-looking landing page, but I was also worried if anyone is really going to provide us their email. After 5 days and 95 clicks, I finally saw 1 email in the log! I was so happy that it actually worked. I’ve never been so anxious about my work before šŸ˜…

When toying around with the ad’s wording and keyword selection, I noticed some interesting cause and effect. The ad is configured to maximize clicks, and we pay each click by the price Google bids the ad automatically for us. With the “right” keyword, I can surely attract a lot of clicks, but at the end of the day, are those visitors our target audience? Not all visitors equal interested customers. They might have been duped by the “right” keyword, a.k.a click-bait. In the end, I find having an ad with genuine intention provides the best value for money. Why pay someone to come to visit your shop knowing they never going to buy anything. 

Over 4 weeks of experimentation, we managed to attain an average CTR(click-through rate) of 1.59%. For the keyword that’s closest to our product, we managed to achieve a CTR of 5.82%, which we believe it’s pretty impressive. But we also needed keywords of our competitor name in it, to widen our reach, hence an overall lower CTR. As for conversion rate, which represents those with true interest, it averages at 1.61%.

“If you’re not embarrassed by your first release, you probably spent too much time on it.”

Reid Hoffman

After 2 weeks of the ad run, we hired a product designer to update the design of our landing page, and the conversion rate went up to 3.26%. About double, which was our initial ballpark guestimate. That also proves I never belong in the design department šŸ˜‰

What’s Next

We’ve nailed the keyword and wording on the ad, and most importantly, we’ve validated the demand with just a small amount of ads fee. From those emails we’ve collected, we want to engage with the users to help tweak our product offering to more closely meet their needs. But we have yet to register a company and decided on our branding. So that’s what we’re going to do first.

While waiting for the ads to run, we’ve come up with a list of brand names that make sense for our product, but that’s just our opinion. Why not let the user decides? I’m going to set up multiple ads each with a brand from our list, and we’ll measure the effectiveness of them while removing our personal opinion from the equation! That’s for the next part of this series. 

Take away

Nowadays with the aids of online marketing tools, starting a new business especially with lean startups methodology can help reduce the risk greatly. Knowing whether there’s a real demand for the product/service that we want to sell is really important to ensure a successful business before we invest in building the actual product.

3D Printed Wrist Brace

I injured my wrist recently, wasn’t serious enough to see a doctor (yet) but there’s an uncomfortable position that I wanted to avoid. From what I learned about recovering from my back pain, to aid the recovery of my wrist I need to avoid irritating it, especially the tendon and ligament.

I’ve seen others using wrist braces and I thought to give one a shot, but then I don’t like to buy single-use products. After some research, I was wondering if I could 3D print my own. In my mind, the design would have to be designed in 3 dimensions (duh!) but since the shape of each person’s hand is different, it would be near impossible to get a good fit with existing models available online.

Turn out there’s a smart designer who designed a model that’s printed flat, soften it with hot water and then mold it to fit the hand. That’s so brilliant!!! The common 3D printing material, PLA had an inherent problem, it softens under the heat of the sun. It starts to soften at around 60’C. But for this case, he turns that into a feature, to make an easy-to-print model that fits all hands.

This is the design on Thingiverse (Credit to puiLAB)

Slic3r showing the scale and cost

Since my Asian hand is typically smaller, I test print with a scale at 75% and later found it to be a bit tight near the thumb, so I end up with 90%. Slic3r shows that it only cost me $0.74, about $1.50 for both prints.

Scaled to 75% on the left and 90% on the right
Test fit. I reuse the wrap from my blood donation, love the smiley!

I’ve recently experienced another commercial product that uses the same technique to achieve self-fitting, SOVA Night Guard. I’m amazed by the outcome, and it cost less than 1/10 of what the dentist going to charge me for a custom fit night guard, while not having to make 2 trips to get it done. Talking about progress in material technology!

I don’t think robots replacing humans is the only problem we’re are facing, advances in technology will always threaten how things are used to be and challenge our comfort zone. The solution is to embrace the change rather than resist.

As a maker, I actually feel that we’re now more empowered than ever to solve existing problems with more creative and ingenious solutions.

Aircon Monitor Part 2 – The hardware – current sensor, ADC, thermistor & Arduino

This is the second part of a multiple part series about some hardware & software that I hacked together to monitor the AC current of our outdoor aircon unit. This part I’ll be discussing how I’ve established the hardware parts selection for this project, which are SCT013 Current Sensor, SAR ADC, thermistor, Gertduino, and Raspberry Pi Model B (rev 1).

  • Part 1 – The introduction – Why, what & how
  • Part 2 – The hardware – current sensor, thermistor, ADC & Arduino (You’re reading this)
  • Part 3 – The circuit design – Analog, digital and data flow
  • Part 4 – The firmware – Arduino, RMS calculation & Raspberry Pi’s UART
  • Part 5 – The software – data collection, analysis & decision
  • Part 6 – The solution – still unknown at this stage

To achieve what I outlined in Part 1, which the aircon is reporting overcurrent during a hot day, I’ll need to measure the AC current and the temperature continuously over time. To be able to capture the peak current, the time resolution would have to be reasonably small. Preferably multiple times within a single cycle of our AC here at 50Hz. The hardware should also be remotely accessible, hence Wifi connection is a must šŸ™‚

AC current sensor

To measure AC current safely, I’ve already had a YHDC SCT-013-000, 100A model which should work well for this. So that’s settled. OpenEnergyMonitor project site has a good report on it and various tutorials on using it.

ADC (Analog-to-Digital Converter)

I wasn’t sure how much current I needed to measure. Considering the aircon is on a 15A plug, a range of 15A should be more than sufficient. The ATmega328P on the any of the Arduino board I have only had 10-bit ADC, which for a scale of 15A, I can get about 15mA of resolution. Typically analog circuits are going to be noisy, plus the noise from the switching power supply of the Pi, I’m going to lose 1 bit if I’m lucky, and likely 2 or more bits. That gives me a resolution of 58~117mA. Assuming if the aircon is drawing at 2A at equilibrium, that only gives me about 34 counts out of 8-bit. Designing a low noise circuit is going to be hard when using a perfboard.

I could upgrade to the built-in 12-bit ADC in Redbear DUO, which would give me a much more comfortable 136 assuming effective 10-bits. Since it’s a 3.3V board, I would have less room to work with on the analog front end using op-amp. If I choose to lower the max current, then I might not be able to capture the peak I intended. In the end, I decided to go with an external ADC, giving me more leeway in the design. As for the sample rate, I wanted to get a decent RMS current measurement, most material I could find online suggest at least 1000 samples/s. I decided to do 5000 samples/s, which gives me 50 samples per half cycle, that should be more than enough for the RMS calculation.

Since I don’t have any ADC here, so I sign up for Element14 Singapore. Fun fact, Element14 Malaysia and Singapore shared the same backend system. How I know? I can’t reuse my username from Malaysia ;). I looked for an ADC that runs on 5V with at least 14 bits and faster than 5ksps. Sorted by price, I found ADS8317 from TI, 16-Bit, 250kSPS SAR converter.

In the past I’ve always stayed with Sigma-delta converter, mainly for it’s linearity and higher resolution. For this, I needed something faster, accuracy is not as important, but the resolution is. So using SAR converter allows me to play with something new while having a bit of challenge.

A good challenge will give a better satisfaction at the end šŸ™‚ I’ve also learnt that this particular SAR converter supports “short cyling”, which you can stop the converter once you have enough significant bits to know that you can skip the rest. The converter works in “successive-approximation”, it produces the bits as you read it. If you stop reading, it stop as well, hence “short” cycling. Although I don’t use this feature here, but it’s an interesting concept to learn, that save time and power whenever you know you don’t need the full 16-bits.

Temperature Sensor

I also wanted to hook up a few temperature sensors to monitor the outside temperature and the temperature near the compressor. I had a bunch of spare 10K NTC thermistors from my 3D printer, that should do the work with any of PIC/Arduino’s ADC.

Micro-controller/Micro-processor

I’ve been bringing my microcontroller/microprocessor boards from back home (Malaysia) whenever I go back to see my family. So I’m spoiled with choices from simple Arduino boards, plain PICs, ESP8266, ESP32, Redbear Duo, Omega2 to Pine64 & various generations of Raspberry Pi.

I’ve decided on Gertduino, an Arduino board that doubles as a Pi HAT, and Raspberry Pi Model B (the first version). I wanted something that can run python, which requires less effort and can be easily updated remotely while having enough storage to be left alone when I’m busy during the week. It doesn’t need much grunt work, so and older Pi suffice. The outdoor unit is near my housemate’s bedroom window, so a reliable design helps by giving him less interruption.

ESP8266 or Redbear Duo both can achieve the same thing, but I have experienced both crashes in a shorter period than the Pi. Not blaming the hardware, but rather the overall system allowing me to crash it with lousy code. The ESP will also require additional ADC for the thermistors. And I’m not fond of tinkering with C++ code when I do my analysis later. Python works best as I could transfer from Jupyter notebook to python script with little to no modification.

That’s all for this week. I’ve had this sitting in my draft for a while. I recently learnt from Coaching for Leaders that I need to have the “courage to be rubbish”, to keep posting consistently, which is what matters than to make sure everything is perfect. I’ll keep up with posting the next part within the next 2 weeks.

Aircon Monitor – Part 1 – The introduction

This is the first part of a multi-part series about some hardware & software that I hacked together to monitor the AC current of our outdoor inverter aircon unit, which is reporting an overcurrent error.

  • Part 1 – The introduction – Why, what & how (you’re reading this)
  • Part 2 – The hardware – current sensor, thermistor, ADC & Arduino
  • Part 3 – The circuit design – Analog, digital and data flow
  • Part 4 – The firmware – Arduino, RMS calculation & Raspberry Pi’s UART
  • Part 5 – The software – data collection, analysis & decision
  • Part 6 – The solution – still unknown at this stage

Note: I’ll add the links when those posts are published šŸ™‚

The Why

TLDR; I want to learn about inverter fail-safe features.

I and my housemate have started working from home around mid-March 2020, right before the Circuit Breaker measure imposed by the Singapore government. With the hot season coming, we started turning on the aircon after lunch and we noticed that it wasn’t cold, and would switch off after some time with the power indicator blinking, which usually means something is wrong. After cycling the power it will be back on, and maybe cold again or it might take a few more power cycling. We never noticed this before COVID-19 when we only operated the aircon at night.

Thanks to my housemate who did a quick search and found out how to read the error code, E7 – Inverter instantaneous overcurrent (DC output). After calling Daikin, they suspected the compressor and for this older model, it will cost around S$700~800 (USD500~575) with a labor charge of at least S$500 (USD360). They recommend a new unit instead which costs around the same. After speaking to our agent and landlord, we decided that we don’t mind observing for now and continue using it as is.

After some observation, we noticed that if we turn it on earlier in the day before the sun shines on the outdoor unit, or when the day is gloomy, it works immediately, and on a hot day, it will work earlier then shut down afterward. So it has to do with the heat in the outdoor unit.

My understanding of the error is that the controller wasn’t able to start the compressor within the designed current limit. Daikin is known for its good fail-safe design. When the outdoor unit is trying to start, we could hear the fan start, and the compressor tries to start and stop after a few seconds. It will keep trying for a while before giving up and throw us the error code E7.

I had some experience with aircon servicing and know the internal quite well, but this fail-safe feature is new to me, especially around the inverter. So I thought why not I try to monitor the current and temperature to see what’s causing it to stop while learning more about this fail-safe feature.

Aside from that, I have used a non-intrusive current sensor coupled with OpenScopeMZ to help my previous landlord troubleshoot a frequent power trip, which didn’t work as expected. I end up using a Murata power monitor which is intrusive as it requires the mains wire to run through the permanent current loop. This is a good opportunity to learn and get the current sensor working. I’ve also wanted to understand the RMS calculation for continuous current measurement.

Lastly, this gives me a stronger nudge to restart my blog post. I’ve broken it down into smaller posts so it’s less daunting to start. Hopefully, it will keep the blogging wheel turning.

The What

What should I measure? Since it’s overcurrent, the obvious thing is to monitor the AC current. Although the error indicated overcurrent on the DC output, getting that requires tapping into the controller sitting outside, a big no-no since we live on the 14th floor and the outdoor unit is hanging outside the bedroom window with no easy access. AC current is the closest and safest I could get to. I also happened to have a spare clamp style AC current sensor in my parts bin, which allows non-intrusive current measurement.

The next parameter is the temperature, so I know at which level of heat that caused the overcurrent. I have a couple of spare thermistors from my 3D printer, so that’s taken care of.

The How

I’ll be making a custom Arduino shield on veroboard, put it on a Gertduino and Raspberry Pi. I think this is long enough as the introduction. I’ll dive deeper into the How in the next part. If this is interesting, stay tuned for Part 2, which comes next week.

Simple programmable load with gain

Today I needed to test a new PCB design for a load cell module. In order to evaluate the load response of the excitation circuit, I have to find a way to control the load current while observing the excitation voltage. The load curent needed is less than 20mA.

A quick search online and I found a simple circuit from Simple programmable load

constant current schematic

The circuit above was designed for much higher current than I need. I also need to read the current. I decided to stay with a 50mA range which coincide nicely for the 5V supply that I’m using with a gain of 0.1V/mA, 5V output = 50mA.

Schematic_Simple-programmable-load-with-gain_Sheet-1_20180406140518

I’m using MCP6002 since it’s cheap and I have plenty of them. It’s not a very precise opamp but precision is not a requirement for me. What’s more important is the rail-to-rail input/output. The high input offset does cause some issue when the control input is near zero or 5V. R2 will help set the gain and the ratio for the current reading. R3 is used when I was testing to make sure everything works as expected.

I prototyped this on a 2 sided perfboard and then hooked up to Analog Discover 2 to make use of it’s waveform generator and oscilloscope to verify my excitation circuit.

Simple programmable load with gain - prototype

I kept the circuit public here:Ā [EasyEDA]Simple programmable load with gain

DIY Case for Raspberry Pi

While waiting for a proper Raspberry Pi case from element14 (formerly known as Farnell), I stumble across a site where the author designed a paper case for his Pi and kindly shared it to the world. I gave it a try today, and easily done it in less than 30 minutes.

The design is well done, taking consideration into paper thickness and folding allowance. Bravo!

Migrating transmission-daemon from RT-N16 to Raspberry Pi + Baby Monitor

Lately transmission on my RT-N16 has been acting a little too unreliable. Since I have 2 spare Raspberry Pi sitting in my drawer, Iā€™ve decided to start utilizing them as my Bit Torrent client. At the same time, Iā€™ve had plan to turn the Pi into a baby monitor. Great!!! Since the router is not far from the infant bed, I could setup both on the same Pi.

First thing first, is to get the Pi up and running. I chose to use the default Raspbian image as Iā€™m more familiar with Debian and for maximum compatibility, in case I need to compile any software. I wonā€™t go through the setup as thereā€™s plenty of ā€œGetting Startedā€ tutorial online for the famous Raspberry Pi. Since I need to connect a webcam to it, I was guessing Iā€™ll need at least the X11 desktop as it involved video. Also based on my prior experience in video streaming via VLC, which needs to run in a window. With that in mind, and my plan to run this headless, Iā€™ll need to setup a remote desktop next.

TightVNC is the de facto Remote Desktop package for Debian. After doing a little bit of reading, I found that x11vnc is actually a better choice, as it utilized the existing instance of the desktop powering the display, which means less resource hog. Using TightVNC on Linux would be akin to using RDP in windows, though TightVNC behaves as x11vnc when running in windows. Instruction to setup x11vnc can be found here.

Now itā€™s time to tackle the video streaming. I was in luck this time, as my Sensonic Webcam 8000 works out-of-box with Raspbian, and I found a good alternative to VLC, motion. Although motion was meant to do motion detection, but it also serve MJPEG via itā€™s built in web server. After following these instruction, all I need to do is to turn off motion detection and my baby monitor is done, yeah!!! Wait, whereā€™s the audio? Well, since I live in a small house, my wife doesnā€™t need audio streaming, which allows more resources for my torrent client >-)

The video stream default to http://my_raspberry_pi:8081. Testing it on the desktop works flawlessly, but the opposite when viewed from an Android phone. The default Android browser tries to download the file. It does work on Chrome running on my SGS3, but itā€™s too heavy to be installed on my wifeā€™s Xperia Mini. I then downloaded a few popular browsers and non of them work with the stream. Later on I found out that MJPEG is not supported oob in Android, bummer. Luckily I found an app called Mjpeg Viewer. Simply key in the URL and ā€œclickā€ Show. Voila! No complicated configuration or lengthy trial and error.

Product Image

Now itā€™s time to work on my torrent. I ran the Shibby mod of TomotoUSB firmware on my router. It comes with transmission and Iā€™ve downloaded more than 100GB of ā€œstuffsā€ using this setup, though it has a few glitches which I could bare with, until it time traveled back a month one day. A few of my downloads goes from 100% to less than 20%. Doing a ā€œVerify Local Dataā€ or force recheck is just too taxing for this little 200Mhz CPU, and it crashed transmission repeatedly. Donā€™t get me wrong, I love this router. It just didnā€™t do the ā€œextraā€ that well.

So now Iā€™ll move the ā€œextraā€ job over to the Pi, with 700MHz CPU, the task of hashing file should be, chestnutty though not peanuts :p. Setting up wasnā€™t any tougher with these instructions. I only followed the part for transmission and ntfs-3g (Default ntfs driver from the kernel is readonly) and skip the hard drive setup as Iā€™m using my existing torrent drive, a 600GB external hard disk. Automount on Raspbian is helpful too, allowing me to avoid editing the error prone fstab.

To make this copy of transmission recognizing all the previous progress, I need to copy the content of resume and torrents into /var/lib/transmission-daemon/info/. After firing up transmission, it listed all my torrents but all 0% with error ā€œNo Data Foundā€. Weird, so I decided to have a peek into the files inside resume and found that the existing path pointing to the actual file is hardcoded along with some cryptic resume data. I would normally avoid editing hundreds of resume files, but itā€™s not easy to move the mount point to the expected path, which is /tmp/mnt/Torrent/ while itā€™s currently mounted at /media/Torrent/. The shortcut to this is to create a shortcut a.k.a symbolic link which I can allow transmission to access all the data via both path.

That only solved 80% of the torrents. What happen to the 20%? It must have been caused by some glitch on transmission with the path pointing to /mnt/Torrent/. Well, another symbolic link to the rescue, and now I have all my torrent back, ready to seed and download. Itā€™s time to go back to the future, by ā€œVerify Local Dataā€, and sure enough it doesnā€™t crash this time.

Itā€™s 1am now, time to sleep -_- {zzzzzz

PS:Any veteran linux user would notice a potential problem. No prizes but give it a guess.